I’d like to interrupt my retrospective to mention an event that is going on in the chess world here and now: the 2021 World Cup. Principally, I’d like to congratulate Sam Shankland for advancing farther than any other American contestant, all the way to the “elite eight,” as they would call it in basketball.
As the #31 seed, Sam considerably outperformed expectations. He caught a break when #2 seed Fabiano Caruana was eliminated by Rinat Junabayev, the #63 seed, in round two. Sam would have had to play Caruana next, and instead he played against Junabayev and beat him. Sam followed that with a 1.5-0.5 win over Peter Svidler (the #18 seed). Next, Sam faced Sergey Karjakin (the #10 seed) in a wild match where Sam took leads of 1-0 and 2-1. However, both times he failed to close out the match by drawing as Black. Karjakin finally overcame him, 4-2, in a match where there were no draws.
Because Sam finished in the top eight, he will qualify for next year’s Grand Prix, which is a possible route into the world championship candidates tournament. Even though he is a former U.S. champion and a 2700 player, Sam doesn’t usually get this kind of opportunity, so it will be exciting to see what he does with it.
The other players to make the final four of the World Cup (along with Karjakin) are #1 seed Magnus Carlsen, #12 seed Jan-Krzysztof Duda, and #30 seed Vladimir Fedoseev.
Okay, let us now proceed with year 43 of my retrospective! I’ve already shown you one game from 2014, my draw against GM Sergei Kudrin, but I put that into a special category as a “game for the ages.” My “game for 2014” came against Paul Richter, who at that point was was improving with blinding speed. In the year 2014, his rating rose more than 200 points, from 2066 to 2288! The loss against me must have been one of his few stumbles that year.
This is not a perfect game, but it does have a perfect ending. When you look at the final diagram, you’ll see what I mean.
Dana Mackenzie — Paul Richter, 7/25/2014
1. e4 c5 2. f4 a6 3. Nf3 e6 4. g3 b5 5. Bg2 Bb7 6. Qe2 Nc6 7. d3 Nc6 8. O-O Be7 9. Kh1 …

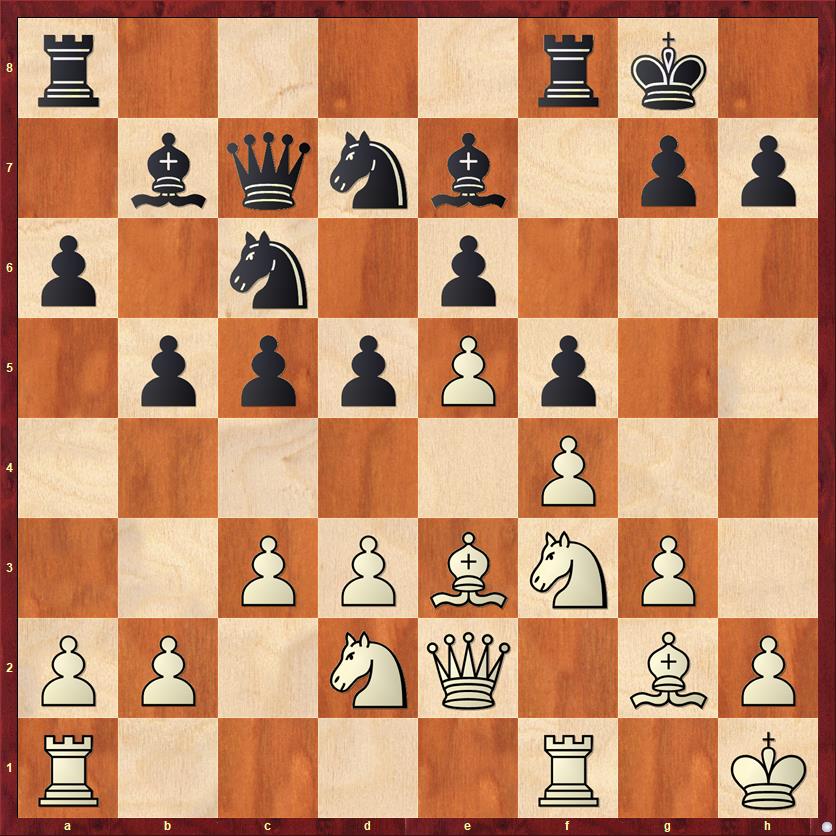
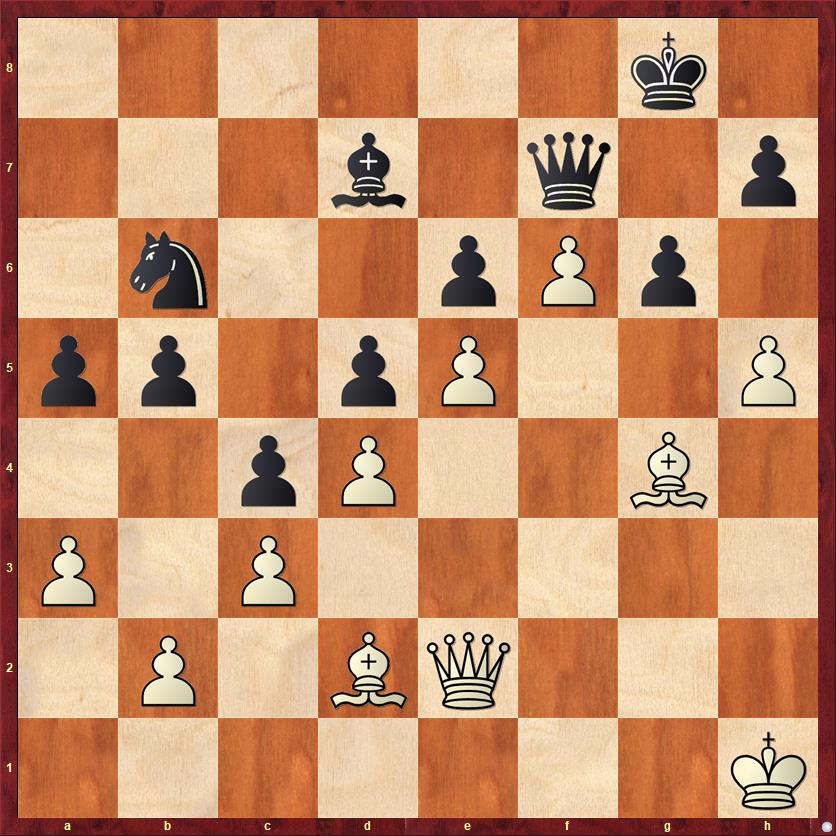
FEN: r2qk2r/1b1pbppp/p1n1pn2/1pp5/4PP2/3P1NP1/PPP1Q1BP/RNB2R1K b kq – 0 9
So far we’ve been playing a game of cat and mouse. Who is going to break first in the center: Black with …d7-d5 or White with e4-e5? With his next move, Richter ends the suspense. The computer thinks I should have played 9. e5 first, but I think it’s a matter of taste.
9. … d5 10. e5 Nd7 11. c3 Qc7
If I were playing Black, I would be tempted to play 11. … d4, with the idea of opening up the diagonal leading to White’s king. But Richter chooses to remain flexible rather than make a possibly premature commitment. That seems consistent with his style of play throughout this game.
12. Be3 O-O 13. Nbd2 f5
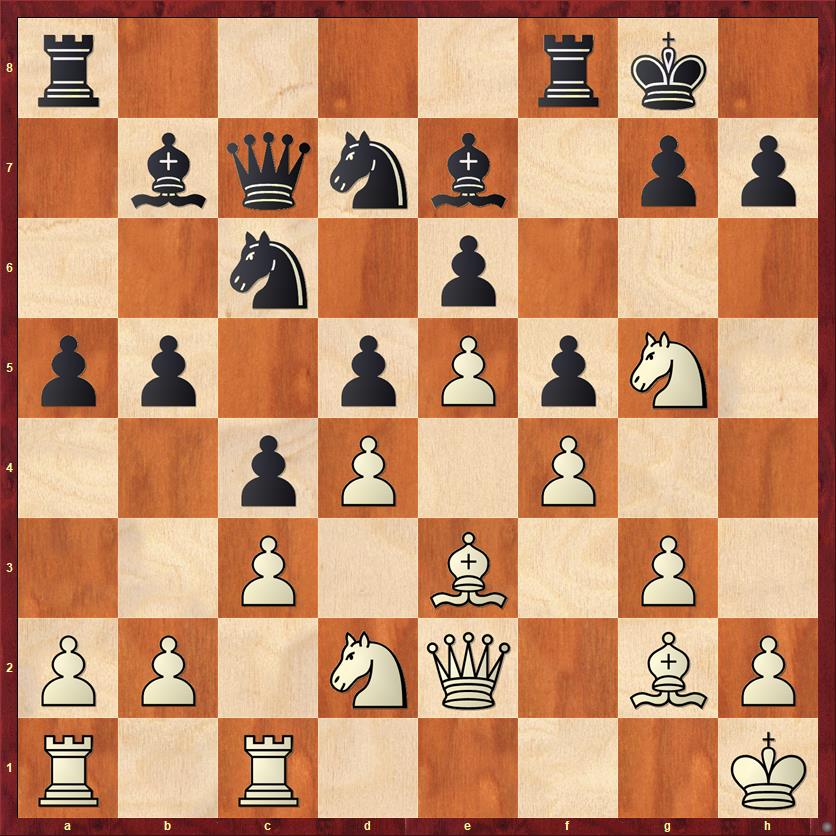
FEN: r4rk1/1bqnb1pp/p1n1p3/1pppPp2/5P2/2PPBNP1/PP1NQ1BP/R4R1K w – f6 0 14
Posing a big decision for White: to take or not to take? We saw a similar en passant decision in the game Mackenzie-Sakai from 2012, and in that game I took. This time I chose not to take. In both games I think you can make a good argument either way, but I think it comes down to the questions: How much do you like keeping your pawn outpost on e5? How much does the capture weaken the opponent’s position? And the Mike Splane Question: How do you expect to win the game?
Once again the computer questions my choice. It thinks I should play 14. ef, when 14. … gf? is very dubious because 15. f5! strikes immediately at Black’s loose pawn formation. After 15. … e5 Black’s central pawn mass looks imposing but in fact it’s weak: after 16. Nh4 white simultaneously threatens d5 and Qg4+, the latter move setting up a blitzkrieg attack on Black’s king. If I had seen this, I certainly would have played 14. ef, but I was too intimidated by Black’s center pawns.
The argument for not capturing is that White keeps his pawn on e5, which cramps Black’s position, and sets up a closed position where we will likely see a pawn storm on the kingside versus a pawn storm on the queenside. Since the kings are on the kingside, I would always have to be a little more sanguine about White’s chances, while acknowledging that Black should be okay with careful defense. If you are a player who likes whole-army assaults rather than blitzkrieg attacks with part of your army, this is the variation for you.
14. Rfc1 …
A little bit of a fake-out here! I’m trying to convince my opponent that I’m going to play on the queenside.
14. … c4?!
I do not like this move, which allows White to really solidify his center and which imprisons the light-squared bishop. On the other hand, Black could argue that my e3 bishop is just as bad as his b7 bishop.
15. d4 a5 16. Ng5! …
FEN: r4rk1/1bqnb1pp/2n1p3/pp1pPpN1/2pP1P2/2P1B1P1/PP1NQ1BP/R1R4K b – – 0 16
Great timing for this move, which strikes at the e6 pawn just at a moment when Black’s pieces are badly placed to defend it. Black has only two options, both of which have major drawbacks. 16. … Nd8 is rather passive and allows White once again to get a blitzkrieg attack with 17. Qh5 h6 18. N2f3! The knight is taboo because 18. … hg? 19. fg with the threat of g6 is just too strong. On other moves I can just continue to leave my knight en prise and play Nh4-g6. This is a legitimately scary line for Black. He could just get blown out.
The alternative, 16. … Bxg5, is much safer, but it gives up Black’s good bishop and leaves Black vulnerable on the dark squares. The consequences of this choice linger until the very last move of this game.
Richter spent more than 30 minutes to decide on this move, and that time usage also had long-lasting ramifications, as we’re going to see.
16. … Bxg5 17. fg …
Another nice thing about this trade for White is that the f4 square is opened up, first as an outpost for my bishop, then my knight, and finally my rook. The game now enters a prolonged maneuvering phase, as both players try to find the optimum placement for their pieces behind the firmly established trenches.
17. … Ne7 18. Bf4 Bc6 19. h4 Nb6 20. Nf3 Ng6 21. Bd2 …
It may be a bad bishop for now, but I still want to keep it. You’ll see why.
21. … Ne7 22. Ng1 Be8 23. Nh3 …
Heading for f4 square, the perfect spot for a knight.
23. … Qd7 24. Nf4 …
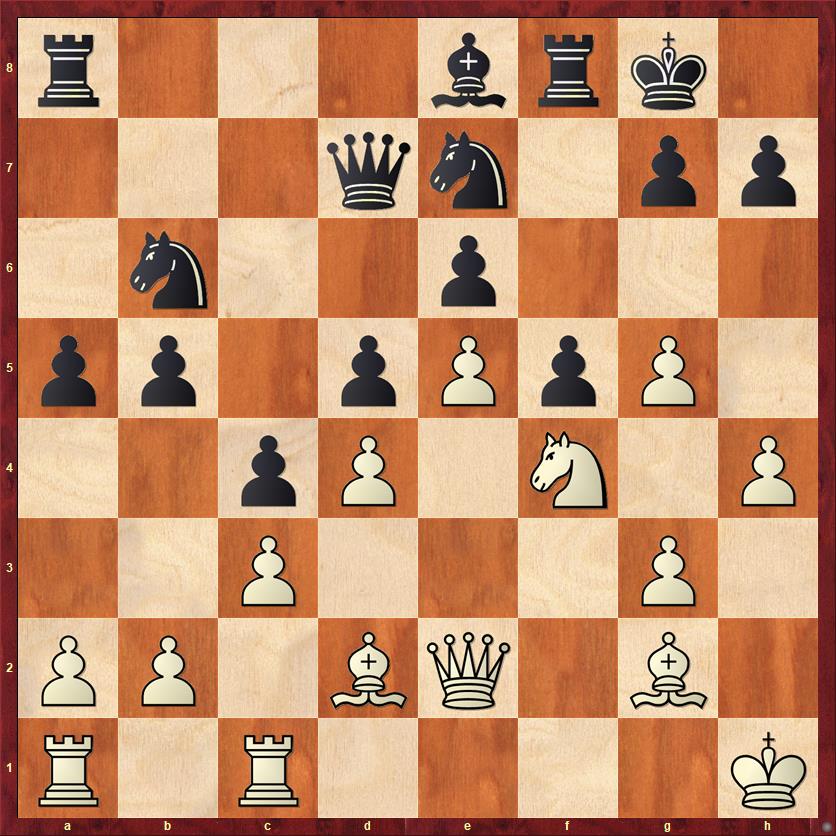
FEN: r3brk1/3qn1pp/1n2p3/pp1pPpP1/2pP1N1P/2P3P1/PP1BQ1B1/R1R4K b – – 0 24
Success! Now I have the piece that I really wanted on f4.
24. … Ng6
Although Black’s move is completely obvious, I remember being disappointed that after using so many tempi to get my knight to f4, it was only going to stay on that square for one move. Sigh.
25. Rf1 Nxf4 26. Rxf4 Qe7 27. Raf1 Bd7 28. a3 Rad8?!
Because Black lost this game, I have to seriously question his approach over the next few moves. He basically “passes,” doing nothing to advance his queenside attack. The alternative would be to start getting serious about counterplay with … Na4, maybe … b4, etc.
The fact that Richter didn’t do any of these things tells me that either (a) he didn’t believe in his queenside counterplay; or (b) he believed that my kingside attack would not amount to anything. So he was willing to just sit and wait for my attack to come.
It is clear from this game that Richter has a flexible, wait-and-see approach to chess. I am just not wired that way. I recognize that there are many positions where “passing” might be exactly the right thing to do, but in general I almost always fight for the initiative, and if my opponent has the initiative I fight for counterplay.
By putting no pressure on White’s queenside, Black gives White essentially infinite time to figure out how to arrange his pieces. If he had put more pressure on me, then I would have only a finite amount of time before Black’s counterplay on the a- and b-files breaks through. Just as a practical matter, I think it’s better for the defender to force the attacker to play accurately, to get it right the first time rather than having second and third chances.
I could give a “?!” to all of Black’s next few moves, but I think I’ve made my point.
29. Bh3?! …
See what I mean? My bishop goes the wrong direction. It should go to f3, d1 and c2. I got it wrong the first time, but Black gave me enough time to correct my mistake.
29. … Rde8 30. R4f2 Rb8 31. h5 g6 32. g4 fg?
This move is worse than “?!”. Black is completely playing on the wrong side of the board, and opening lines for White’s pieces. 32. … Na4 was still best.
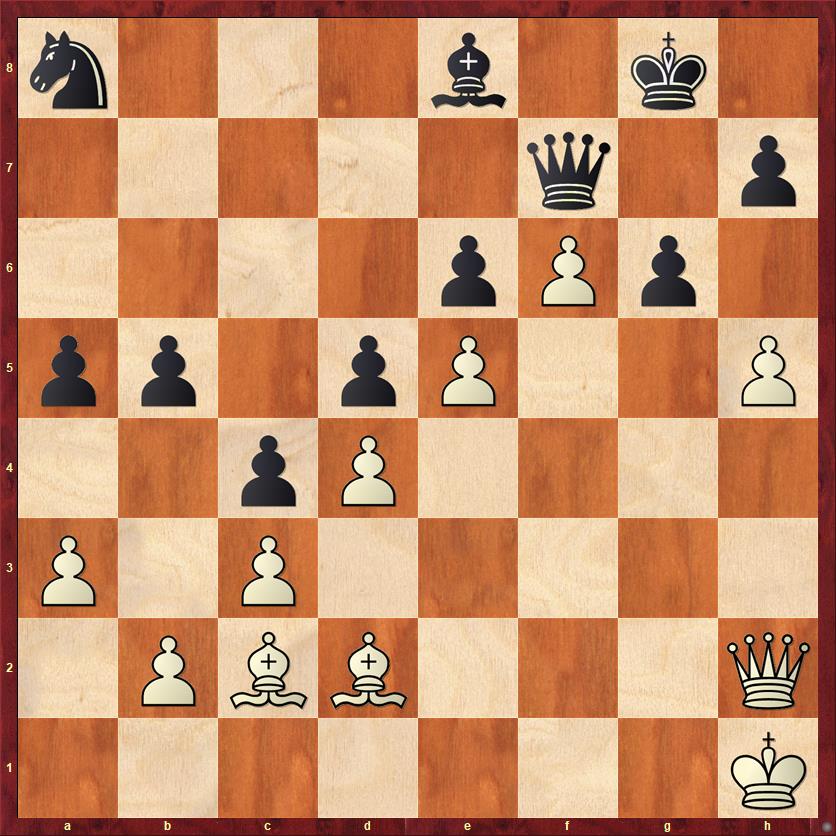
FEN: 1r3rk1/3bq2p/1n2p1p1/pp1pP1PP/2pP2p1/P1P4B/1P1BQR2/5R1K w – – 0 33
Here the computer thinks I missed a huge opportunity: it sees 33. Rf6!, sacrificing the bishop, as a forced win for White (+5 pawns). Let me say that, first of all, I am agog at what the computer sees. I guarantee that I never even considered this move. The computer’s idea is that 33. Rf6 gxh3 34. hg Qg7 35. gh+ Kh8 36. g6 is just going to be absolutely murderous. And on the more cautious 33. Rf6 gxh5 (it’s pretty funny that I have to specify which “gh” capture I mean), White will blithely offer the bishop again with 34. Bxg4!
I see it, I’m in awe of it, but I don’t think humans can really play this way, except maybe Tal or Jobava at their peaks. And frankly, this all seems to me like superfluous brilliance. The simple recapture on g4 also gives White a huge and probably winning attack, at no risk. So that’s what I played, and I doubt that I took more than a few seconds on it.
33. Bxg4 Rxf2 34. Rxf2 Rf8 35. Rf6! …
So I think that the reason for Richter’s mistake on move 32 is that he expected to trade both pairs of rooks, and he thought that this would help him defend. The problem for him is that the second trade happens on f6 and gives White a beachhead for his attack right in the face of Black’s king.
35. … Rxf6 36. gf Qf7
FEN: 6k1/3b1q1p/1n2pPp1/pp1pP2P/2pP2B1/P1P5/1P1BQ3/7K w – – 0 37
If you’re playing through this game, this is a place where I really urge you to stop and take your time, and ask: What is White’s winning plan? Go ahead, take your time.
In this position I worked out a series of moves that I thought would win by force: Qh2, Bd1, Bc2, Bh6, Bg7, hg, and either Qxh7 mate or Qh8 mate. It’s a good plan. But there is a little flaw in it, as we’ll see. And there is a question of move order.
37. Qh2?! …
According to the computer 37. Bh6! is more accurate, and this time I agree. One reason it’s better is that it sets up another way to win. If, for example, Black plays 37. … Nc8, White plays 38. hg! and either:
- 38. … Qxg6 39. f7+!! (Did you see this? I sure didn’t.) 39. … Qxf7 (of course not 39. … Kxf7 40. Bh5) 40. Bh5 Qe7 41. Qg4+ Kh8 42. Bg5; or
- 38. … hg 39. Bg7 Qe8 40. Qh2 Kf7 41. Qh6! Qg8 42. Bh5! Ne7! 43. fe! Qxg7 44. Bxg6+! Qxg5 45. Qf8 mate. Sensational, unbelievable stuff, sacrificing two pieces for a mate that nobody has ever seen before.
Mike Splane has asked me many times, what do you get from computer analysis? Most of the time, I admit, it’s a crutch. But sometimes it expands your mind. I can hardly ever come up with moves like 39. f7+ and 44. Bxg6+, but I don’t want to give up on the possibility of learning to look for such moves. In this case I don’t think they are superfluous brilliance. It’s about learning to use your pieces to their full potential.
37. … Na8 38. Bd1 Be8 39. Bc2?? …
FEN: n3b1k1/5q1p/4pPp1/pp1pP2P/2pP4/P1P5/1PBB3Q/7K b – – 0 39
The correct move order was 39. Qg2 (or 39. Qg3) first. I forgot that the bishop had one important duty on d1. Let’s put 4 seconds on you clock: Do you see Black’s amazing drawing resource?
39. … gh??
This isn’t it. The drawing move is 39. … g5!, with the idea of taking on h5 and trading queens. There’s nothing that White can really do about it; the best I can do is play 40. h6 Qh5 41. Qxh5 Bxh5. Although I can win a pawn with 42. Bxg5, Black has an unbreakable blockade after 42. … Bf7.
Chess is hard! There was nothing wrong with my plan, but there was just one little trick that I needed to watch out for. Note that after 39. Qg3, the trick would not have worked. After 39. … g5 40. Bxg5 the bishop on d1 defends h5, so Black can’t play 40. … Qxh5. White finishes up with Bh6, Kg2 (to avoid check), Bc2, etc. just as in the game.
It’s good to have plans that last for multiple moves, but it is very important to “check in” with reality after each move. If something happens that you weren’t expecting, you might have to change your plan and play Qg3 instead of Bc2.
The reason for my failure is that I didn’t “check in.” But what was the reason for my opponent’s failure? Why didn’t he spot 39. … g5? The reason, first, is that he had only four seconds left to make two moves. You can’t even think at that speed — you just have to grab a piece and move. Of course, he could and did think while I was considering my move. That brings us to the other reason for his mistake — a chess reason. I fully believe that he thought about my move 37. Qh2 the same way I did: White wants to take on g6 and then mate on the h-file. So as far as he was concerned, the whole point of 38. … Be8 was to set up 39. … gh, blocking the h-file. He didn’t realize (and I didn’t realize) that the real point of 38. … Be8 is to force a queen trade.
Well, as I said at the beginning, this was an imperfect game. After our amazing double blunder on move 39, the game ended up more or less the way it “should have.”
40. Qg3+ Kh8 41. Bh6 a4
Probably a better try was 41. … h4, hoping that White will play 42. Qxh4?? and allow a queen trade after 42. … Qh5, with a draw. But if I was smart, I would ignore the pawn and play 42. Qg5!, winning as in the game.
42. Bg7+ Kg8 43. Qg5! Black resigns
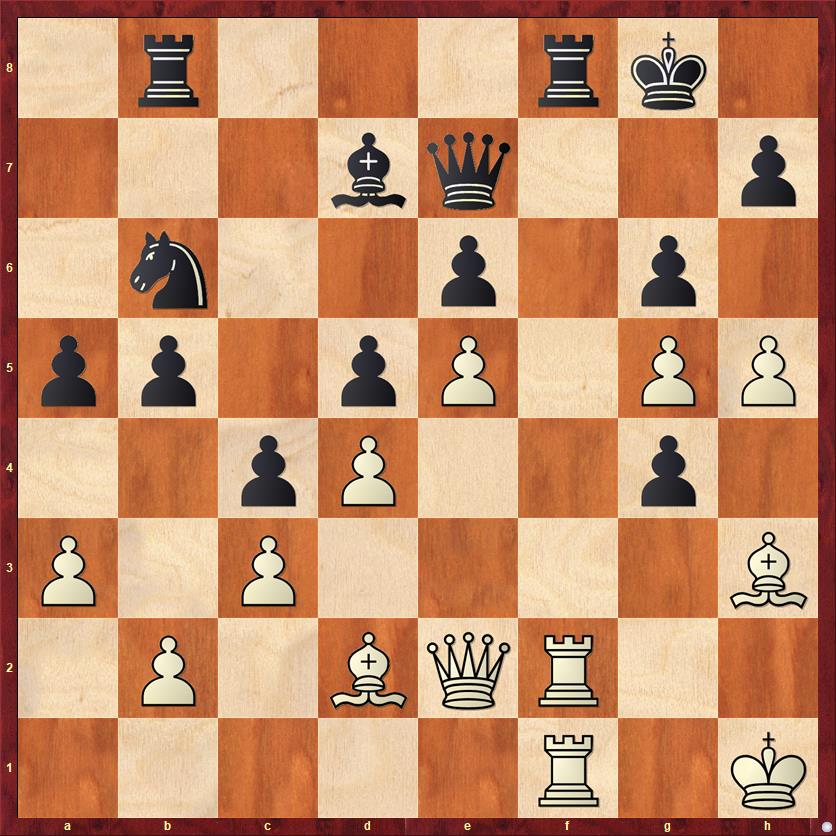
Here is the beautiful finish. If Black plays 43. … h4 (still trying to set up Qh5), then White wins with 44. Bxh7+! Kxh7 45. Qh6+ Kg8 46. Qh8 mate. I can’t resist showing you the checkmate with one more diagram.
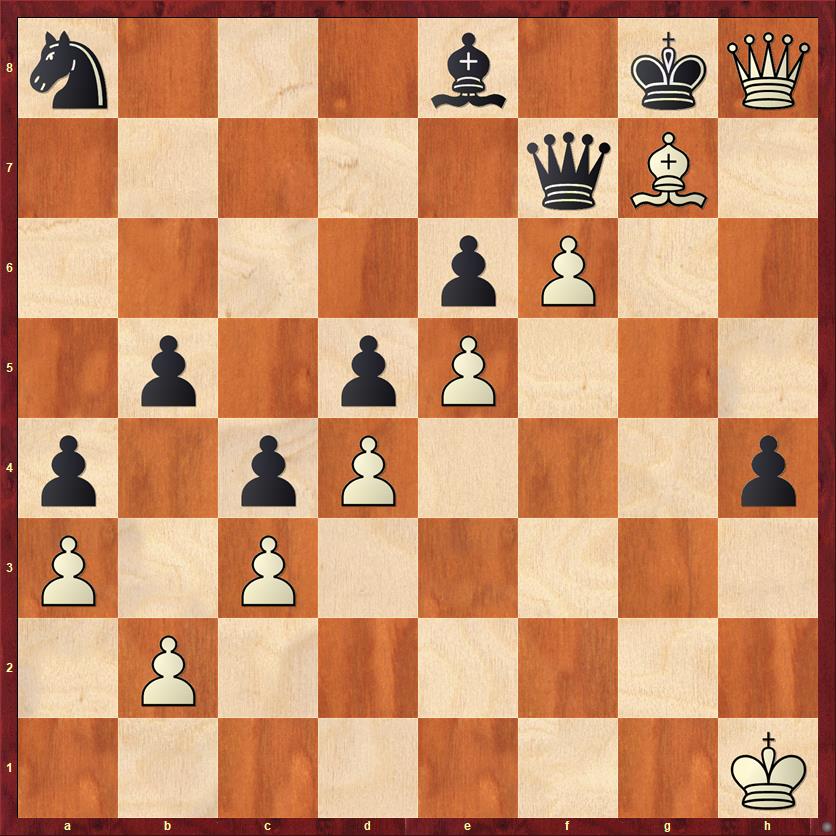
FEN: n3b1kQ/5qB1/4pP2/1p1pP3/p1pP3p/P1P5/1P6/7K b – – 0 46
This has to be one of the most aesthetically satisfying final positions I’ve ever seen. White’s pieces form a giant check mark on the board, everything arranged along that one long diagonal, with not a single irrelevant piece except for my king at h1. And even the the king at h1 and the knight at a8 have a certain symmetry. Chess meets geometry!
Lessons:
- A position where the players have attacks on opposite wings, but the kings are castled on the same side, is almost always more pleasant to play for the player who is attacking the opponent’s king.
- Nevertheless, the player who is not attacking the opponent’s king should not give up on his attack as worthless. A breakthrough on the opposite side will often force the opponent to divert resources to that side.
- Don’t open lines that will be controlled by your opponent’s pieces.
- It’s good to plan several moves ahead, but it is also important to re-evaluate the position every move to make sure that things are going according to plan. Sometimes you may need to play moves in a different order or change your plan entirely.


{ 1 comment… read it below or add one }
Hi Dana.
I believe 14. … c4 should get a real ? instead of ?!, because it is a severe positional mistake as the center is blocked after 15. d4 . As a result it enables White to attack on the kingside while a counterplay on the queenside is hampered or delayed.
It has been known for a long time, that in positions arising from the French Advance-type or the QGD Black’s …c4? often is an inferior move causing the above mentioned situation and should be replaced by …cxd4 and a counterplay against the pawn on d4. Exemplary games for this bad move are Pillysbury – Marco, Paris 1900 and Forgacs – Tartakower, St. Petersburg 1909.
And even later even ex-World-Champions suffered a bad fate, when applying this inferior move and setup in similar positions: see Botvinnik – Capablanca, AVRO 1938 and Miles – Spassky, Montilla 1978.