The headline says it all! Yesterday, my student Atlee (~1500) scored his first draw against me in our weekly training game. I knew this was going to happen eventually, and I wondered what it would take for Atlee to draw or win. The short version: I blundered a piece but managed to fight back and get significant counterplay. Eventually he gave back the piece for two pawns and a dead-drawn endgame.
But I know you want the long version, right? Otherwise you wouldn’t be reading this blog. So here we go. I’ll start at the first turning point. Atlee was playing White, and I was playing Black.
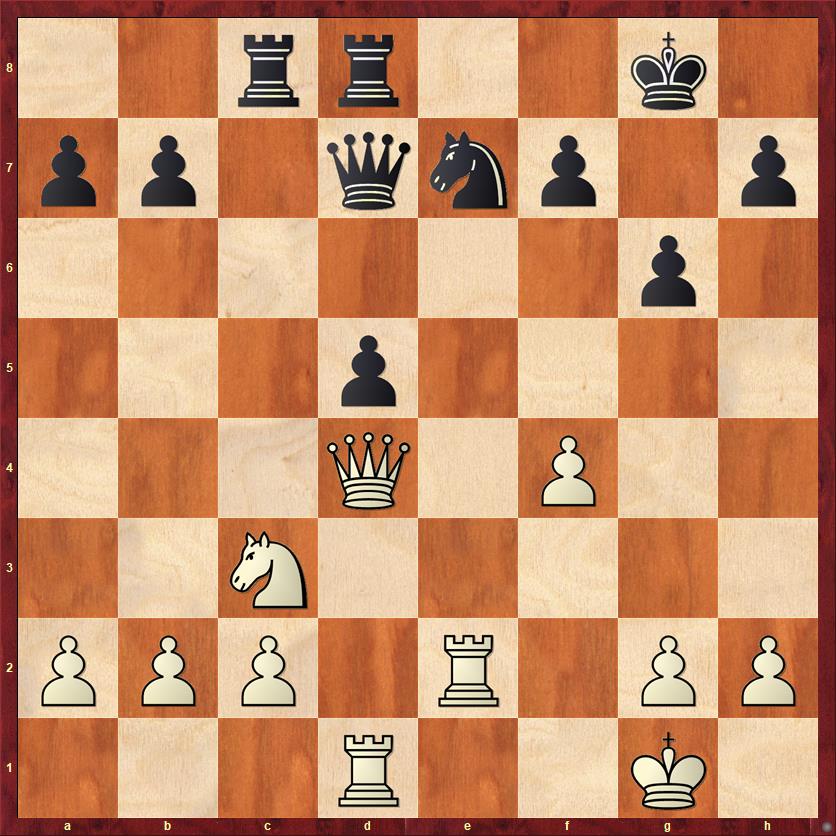
FEN: 2rr2k1/pp1qnp1p/6p1/3p4/3Q1P2/2N5/PPP1R1PP/3R2K1 b – – 0 19
I’m not ordinarily a fan of isolated queen pawn positions, but I thought that it would be useful practice both for me and for Atlee. It didn’t go very well for me, and I’m already in a position where I have to make a difficult choice. Should I play 19. … Nc6, a safe move that leaves me in a rather defensive posture? Should I play the more aggressive 19. … Nf5, offering to sacrifice the a-pawn? Or should I try something different?
The thing that bothers me most about this game is that I went against my instincts. Normally I would play 19. … Nf5! That’s Mackenzie chess: don’t worry about the pawn, fight for the initiative. But I just didn’t see where my compensation for the pawn was. And I have to calculate two pawn sacs, not just one, because he could take either on a7 or on d5.
The first thing I missed was that after 19. … Nf5! 20. Qxd5 Qc7! I win back the pawn immediately, because I’m threatening both … Qxf4 and … Qb6+, forking the king and the b-pawn. Of course, there’s more analysis to be done, but Black is doing fine here.
The second thing I mis-evaluated was the line 19. … Nf5! 20. Qxa7 Qc6. This looks like a slow move, because it lets White’s queen get back to safety with 21. Qf2, but after 21. … d4 I have the initiative. If White plays 22. Ne4, then 22. … Ne3! is already a strong move, forcing White to give up the exchange for two pawns. The resulting position is still kind of messy and unclear, but this is for sure the kind of game Black wants: active pieces, no isolani to worry about any more.
Instead, I made a classic psychological mistake: you debate between Plan A (19. … Nf5) and Plan B (19. … Nc6), you don’t like either, and then you impulsively play Plan C without giving it nearly enough thought. This kind of mistake happens so often that we ought to give it a name, like “The Plan C Fallacy.”
19. … Rc4?
This is not a good move, because 20. Qf6! would put Black in hot water. My plan was to answer 20. Qf6 with 20. … Nf5??, but that would have been a disaster after 21. Rxd5! In fact, the only playable move for Black after 20. Qf6 would be 20. … Rc7, battening down the hatches for an agonizing defense.
Atlee surprised me instead by playing the materialistic move
20. Qxa7 …
I shouldn’t have been surprised. Materialism is Atlee’s style, as it is for most 1500 players. But that doesn’t mean his move is bad! I didn’t give him enough respect. I played my next move much too rapidly, without even stopping to ask myself if there was a reason why he was giving away his f-pawn
20. … Rxf4??
Falling into Atlee’s trap. I have to say that this is one of the first times I can even remember him setting a trap for me, so this is definitely a positive step in the evolution of his game.
21. Qe3! …
Winning a piece. Now White is completely winning. Ironically, I enjoyed the next 15 moves, when I was objectively lost, much more than I enjoyed the first 20 moves! Once you’ve gotten into a lost position, you can amuse yourself by coming up with ways to throw a monkey wrench into your opponent’s plans.
21. … Rb4! 22. Qxe7 Qxe7 23. Rxe7 Rxb2
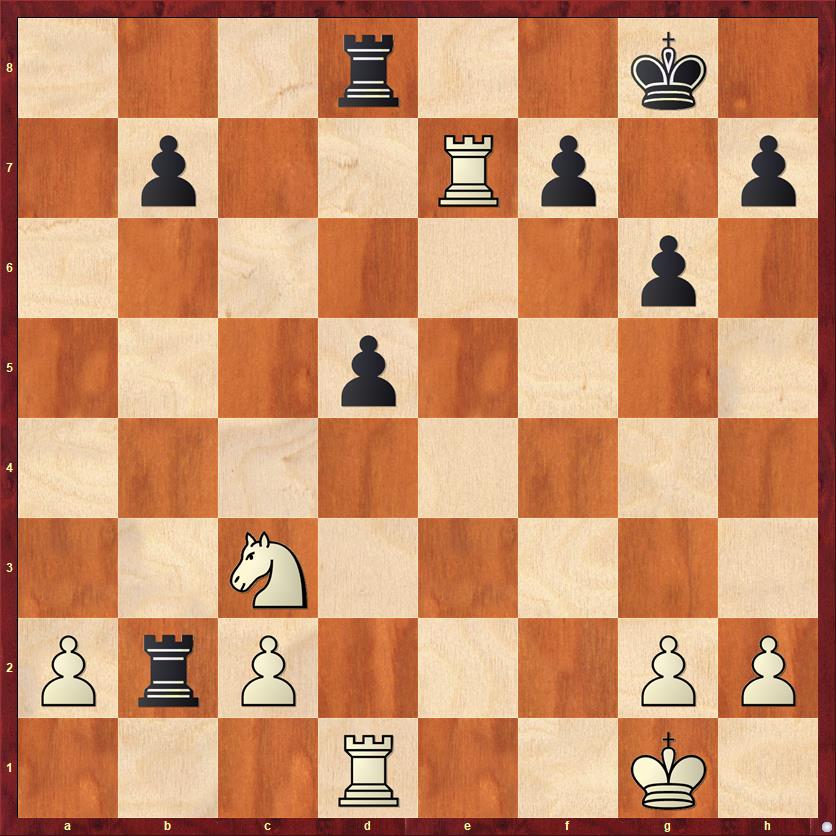
FEN: 3r2k1/1p2Rp1p/6p1/3p4/8/2N5/PrP3PP/3R2K1 w – – 0 24
If the last diagram was a crucial position for Black, this is a crucial one for White. With a knight for a pawn, White should be winning. On the other hand, the queenside pawn structure is extremely shaky. If Black can manage to liquidate all the queenside pawns, then he might just be able to hold the endgame. White really needs a plan here: just playing moves won’t work. What do you think is the best plan?
24. Rxd5?! …
Ironically, this is the computer’s preferred move for White — but I think that for a human player, it’s a step in the wrong direction.
For a human, by far the easiest way to win this game is to make sure that you keep at least one queenside pawn on the board. White could accomplish that with 24. Nxd5! After 24. … Rxc2 25. Rxb7, White gains a tempo thanks to the threat of Ne7+ or Nf6+ winning the rook on d8. Black has to stop and prevent that with something like 25. … Kg7, and then White can play 26. Ra7 and hold his passed pawn.
This is how good chess works: you use tactics (the discovered attack on the d-file) to enable you to achieve a strategic goal (keeping at least one queenside pawn).
Why, then, does the computer think that 24. Rxd5 is the best move? Because the computer calculates that it can still win this game middlegame-style.
24. … Rc8
Of course, to make things as difficult as possible for Atlee, I do not want to trade rooks. After 24. … Rxd5? 25. Nxd5 Rxc2 26. Nb4 White achieves his goal of keeping a queenside pawn on the board.
25. Rd3 Rxc2 26. Nd5 Rxa2
Achieving my first strategic objective, and threatening checkmate too! Once again, we see the idea of tactics coming to the aid of strategy.
Nevertheless, the computer doesn’t bat an eye and it says that White is still winning.
27. Re1? …
A big strategic concession. White’s rooks are now both passively placed, while Black’s become as active as possible.
The computer says that White is still winning (+3 pawns) after 27. Nc7! Few humans would come up with such a move, but it’s actually quite logical. White prevents the checkmate, stymies the activity of one Black rook, and prepares to double his own rooks on the seventh rank. After, say, 27. … Rc2 28. Rdd7 Rf8 29. Ne8 (not 29. Ne6?? Rc1+ 30. Kf2 fe with check!) White will bring his knight to d6. Black will then have no way to defend the pawn on f7. After that, White will either have a mating attack or force Black to give up major material. The computer saw this all the way back on move 24. That’s what I meant by “winning middlegame-style.” However, for human players this is a much higher-risk way to handle the position. For example, notice that in the line above, White could easily have gone wrong with 29. Ne6??, which looks like a killer move but instead backfires spectacularly.
Although I didn’t see 27. Nc7, I was definitely happy to see Atlee play 27. Re1, because he’s retreating while my rooks are taking over the board.
27. … Rcc2 28. Rg3 Rd2 29. Nf4 b5 30. h3 b4 31. Rb1 Rd4
Unexpectedly, White’s knight starts to run out of squares. By playing passively, White has gotten into a position where his pieces do not coordinate well.
32. Nd3 Ra3 33. Rd1 …
The knight is now pinned in two different directions! Atlee is lucky not to be losing material here. Unfortunately, I don’t have a good way to increase the pressure on the knight. Possibly 33. … Ra5, with ideas of relocating to d5, might be worth a try. I finally decided that the way to put the most pressure on Atlee was just to advance my pawn.
33. … b3 34. Kh2! …
A good move from Atlee. I had been expecting 34. Kf2, but there is no reason for White to move his king out into the open. This move protects the rook and thereby breaks one of the pins.
34. … f5
This was a general-principles move. I didn’t see any way to improve the position of my rooks or my b-pawn, and I thought that on general principles I should gain space and start bringing my king into the action. Especially with Atlee’s king hidden away on h2, the difference in activity of our kings might become an important factor.
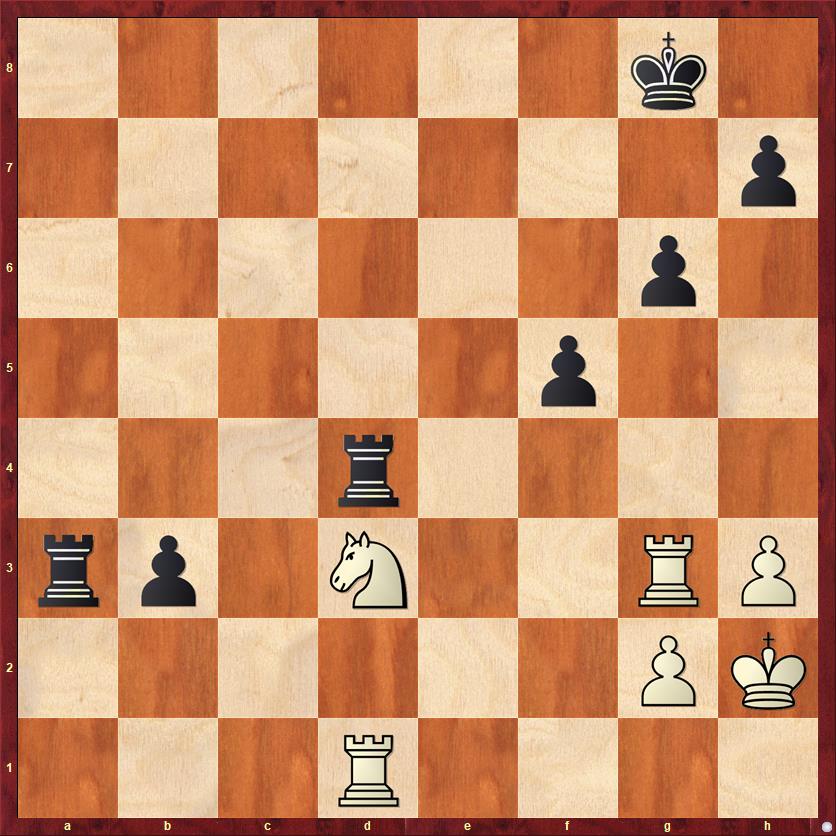
FEN: 6k1/7p/6p1/5p2/3r4/rp1N2RP/6PK/3R4 w – – 0 35
35. Rb1?! …
I give this a question mark and an exclamation point for two different reasons. The question mark is because Fritz’s evaluation after this move drops from +1.8 pawns for White to 0.0. The correct move, according to Fritz, is 35. Rf1, which has two points. First, it prevents … f5-f4, and second, it threatens Rxf5. So Black may have to defend with a move like 35. … Rd5, and then White can play 36. Rb1 more advantageously because Black won’t have … f5-f4 as an answer.
Computers are good at this sort of two-step. Instead of going straight to b1, the rook first goes to f1, tweaks the position a little bit, and then goes to b1. It’s the sort of thing that I hardly ever think of.
Even so, I’m a little bit skeptical of that +1.8 evaluation. Maybe Magnus Carlsen would win this position as White, but I think that very few other humans would be able to do it. From the practical point of view, it’s very unlikely that Atlee would be able to win this game against me, and so he makes a very sensible decision: bail out to a draw as quickly as possible. That’s why he gets an exclamation point.
35. … f4 36. Nxf4 Rxf4 37. Rgxb3 Rxb3 38. Rxb3 …
The R+2P vs. R+2P ending is as drawn as it could possibly be. I played a few more moves just to see if Atlee would make the right decisions, and he did.
38. … h5 39. Rb7 h4 40. Rd7 Rf7 41. Rxf7 Kxf7 42. g3 g5 43. gh 1/2-1/2
Both of us had something to be happy about in this game! Atlee played well to get me in a middlegame I didn’t like and set a trap that I didn’t see. After that, I did well to save a lost position. And then Atlee did well to recognize his opportunity to simplify and get an easy draw.


