Last year, after bingeing too many times on chess games played against the computer, I said, “No more.” I actually stuck to that resolution for about seven months, but then I updated the operating system on my Apple computer. The chess program I had on that computer (Shredder 12) no longer worked, so I pulled the trigger and updated to Shredder 13. And of course, having a newer and stronger version of the program, I had to try playing a few games against it.
After falling “off the wagon” for a couple days, I remember now why playing against the computer was such a bad idea, and so I will renew my vow not to do it again. However, one of my games did give me this entertaining position to look at. I’m playing White.
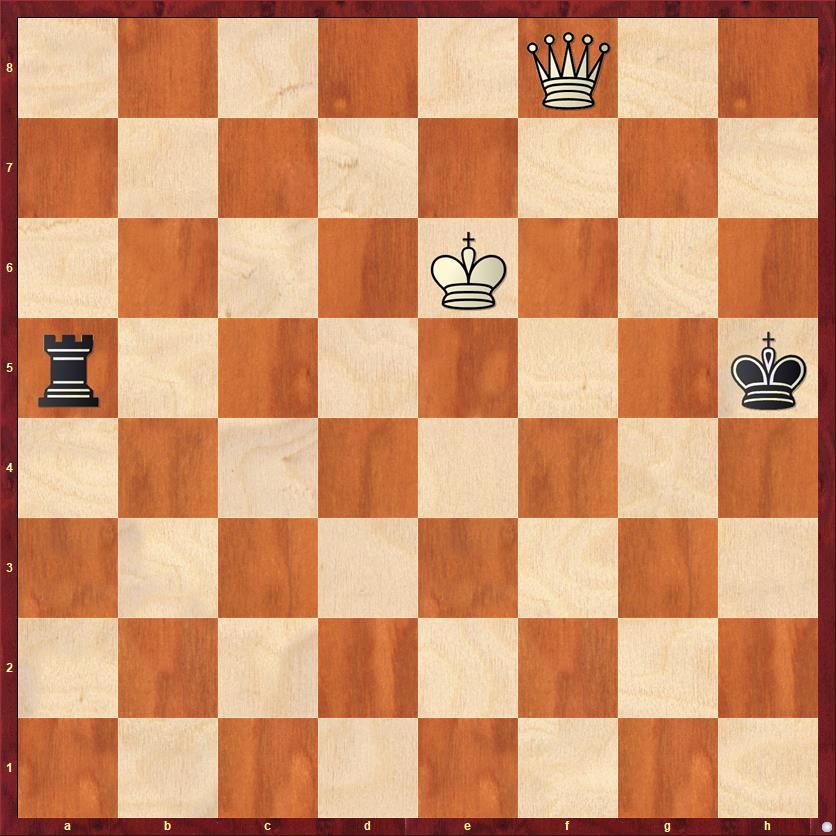
FEN: 5Q2/8/4K3/r6k/8/8/8/8 w – – 0 55
In the spirit of full honesty, let me say that this position did not occur in our game. I made a mistake on move 25 and lost, but then I was curious what would have happened if I had made the right move, so I played out the game from there and reached this position.
This is one of the Four Endgames of the Apocalypse that I’ve written about before: K+B+N vs. K, K+Q vs. K+R, K+Q+h vs. K+Q, and K+R+B vs. K+R. They’re the most difficult endgames that are likely to arise in human play, and I have played each of them from one side or the other in tournaments. However, I’ve never played the K+Q vs. K+R endgame against the computer as part of a game, rather than as an exercise. I was very curious about whether I would be able to win it.
Until computers came along, the conventional wisdom about this endgame was that Black has to keep his king and rook close to each other, in order to avoid combinations where the king and rook get forked. Unfortunately, this passive approach allows White to simply squeeze the K+R into a corner, reaching a standard zugzwang position where Black is forced to separate them against his will.
But when you play K+Q versus K+R against a computer, you will find that it does not hesitate to separate the king and rook, and it’s annoying as heck. The position above is a typical example — and a good one to remember if you ever find yourself defending this endgame with the rook. An optimal formation for Black is to put his king and rook on opposite colors and opposite sides of the board, and with the rook on the same rank (or file) as the king. For example, a5 and h5. On those squares they cannot be forked. If Black could just keep them there forever, he could draw the game.
So what is White to do? First, let’s take an inventory of the forking squares: e1, d2, c3, b4, c7, and d8. (Not b6, because the White king is in the way of any checks on the 6th rank.) In order to have access to the majority of these square, White’s queen should head toward the first four ranks. This immediately makes 55. Qf3+ the strongest candidate for his first moves. The other possible checks, on e8, f7, or h8, do not “head in the right direction.” Another way to think of it is that White’s king has a lot of influence on the fifth, sixth, and seventh ranks, preventing Black’s king from running in that direction. So it makes sense that the queen should mostly patrol the first four ranks, in order to give White influence over that part of the board. So our first move is 55. Qf3+. But we’re just beginning!
Another very interesting thing you’ll notice is that Black’s king has to be very careful about moving onto any dark squares. In this position he does not have to be careful yet. But for example, after 55. Qf3+ Kg5 56. Qe3+ Kh5 (Black should head for this “unforkable” square whenever he can) 57. Qe2+ now we already have a position where Black’s king cannot go to any of the dark squares: 57. … Kg5 or 57. … Kh6 allow a fork on d2, while 57. … Kh4 allows a fork on e1. It’s as if White had an invisible dark-squared bishop on the board, covering g5, h6, and h4! That is a huge help for the queen. Black’s only move is 57. … Kg6, and now after 58. Qd3+ Kh5 (back to the “unforkable” square), we have a position where White has to come up with something clever. A quiet move.
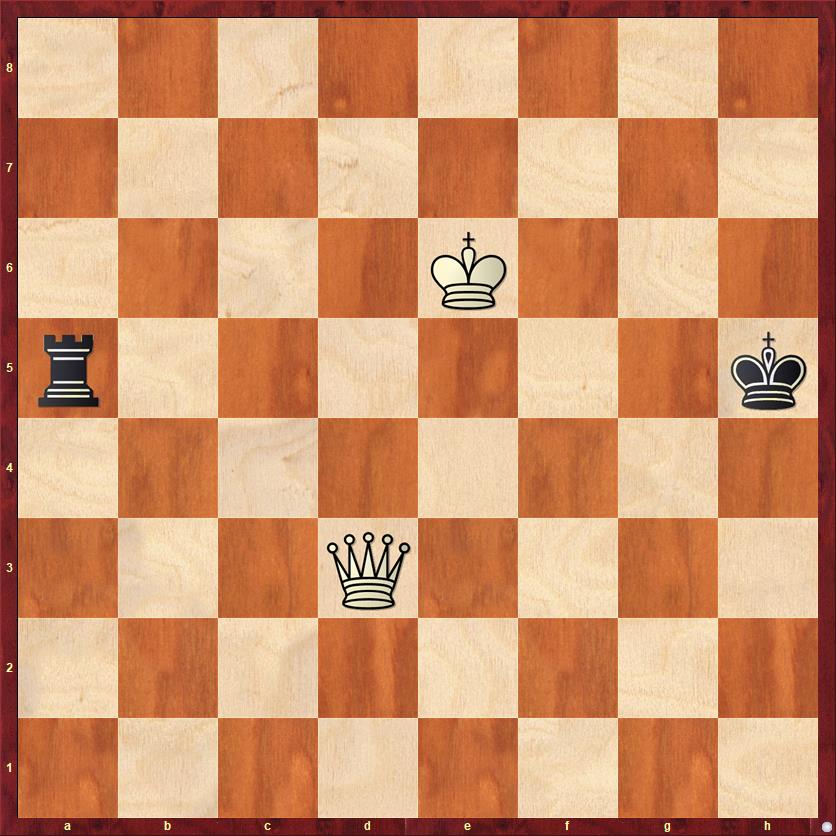
FEN: 8/8/4K3/r6k/8/3Q4/8/8 w – – 0 59
Do you see the winning move? I do not believe that White can make progress in this position just by chasing the Black king with checks. Here, it’s time to bring his second piece into play, with 59. Kf6! Here are the points of this exquisite move:
- It threatens 60. Qh3 mate.
- It restricts Black’s king, so that the next time White plays a diagonal check, the king will not be able to play … Kg6 any more and will have to move to a dark square.
- The king is also safe from harassment by rook checks, primarily because the Q on d3 prevents … Ra6+. Note that d3 is the only square on the board (aside from f1) where the queen hits both h3 and a6.
Black has no good moves, and the game ends very quickly after 59. … Kg4 (or h4) 60. Qc4+ Kh5 (once more back to the “unforkable” square) 61. Qe2+, and as per point #2 above, Black is forced to a dark square and loses his rook to a fork.
I hope that this gives you a new appreciation for just how tricky it is to win this endgame. This whole variation hinges on White’s being able to maneuver his queen to the unique winning square, d3. When you’re playing this endgame against a computer, it will over and over again find the lines where you can’t win just by chasing the king around, and you have to find a quiet move or a zugzwang. Humans are not very good at that.
After the game, I was curious what it would look like if I drew a decision tree, a diagram that shows White’s best move against every Black move in every position, starting from the first diagram. How complicated would it be? Here is what I came up with.
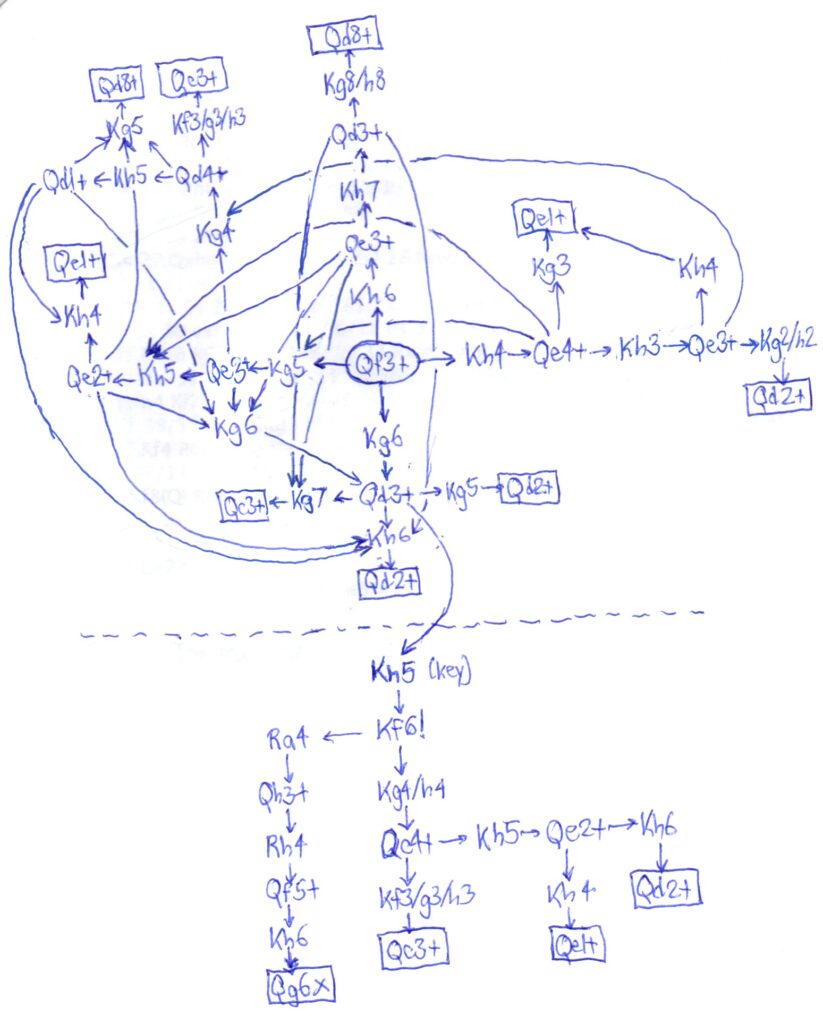
Notice that I’ve put the first move, 55. Qf3+, at the center of the tree, and succeeding moves go outward from the center. On one hand, I thought this was interesting to look at. It’s a proof without words that White is winning. Every single variation is covered, and terminates either with checkmate or a fork of the king and rook. No words are needed! So, in one sense, it’s a much more efficient representation of White’s winning technique than this post, which has hundreds of words.
On the other hand, for a human it’s absolutely useless. You can’t apply this decision tree to any other position. By comparison, all those hundreds of words I’ve written may give you help in analogous positions. The importance for Black of the square h5; White’s idea of putting his queen on the side of the board where his king isn’t; the importance for White of checks on the white diagonals; the “invisible bishop” that prevents Black’s king from moving to dark squares — all of these concepts could be useful to you in other positions.
But there is one nice pedagogical point about the diagram. Notice how it falls into two halves, above and below the dashed line. Above the dashed line we have all the positions that White can get to just by playing queen checks and never touching his king. That top half is “level one.” But in order to win the position, when we get to the key position we need to go up to “level two,” changing the position by moving our king. Once we’re on level two, the decision tree simplifies dramatically and we can calculate our way to victory.
Lessons:
- When defending with K+R vs. K+Q, if you must separate the king and rook, try to aim for a position where they are as far apart as possible, on the same rank or file, and on opposite colors.
- When trying to win with K+Q vs. K+R, if your opponent has separated his king and rook as in part one, use checks to maneuver your queen to a side of the board that is away from your king, so that you have access to the largest number of forking squares and have “influence” over all parts of the board.
- If Black’s king and rook are separated, it becomes very dangerous for the king to move to the same color square as the rook. If you are playing White, you can visualize this as having an “invisible bishop” helping your queen.
- If Black defends perfectly, White cannot win with queen checks alone. At some point White will need to play a “quiet move” with his king in order to hem in Black’s king. If you are White, you should prepare for the quiet move by looking for “magic squares” for your queen that defend your king against any possible rook checks. (In this example, d3 was the “magic square.”)


{ 2 comments… read them below or add one }
This is a bit reminiscent of the theory of corresponding squares in king and pawn endgames from Dvoretsky’s Endgame Manual, where you can match squares up with numbers. Is there an analogous theory of corresponding squares for Q vs. R endgames?
KBN vs K is easy, replace with KBB vs KN or KNN vs Kp