A couple weeks ago I wrote about an online game that I played against Grandmaster Mackenzie Molner. We agreed to play a second game with the same conditions: game in 30 minutes, 5 second time delay per move, and each of us would write our comments on the game for the blog.
Just as a reminder, in our first game I played White in a King’s Gambit. Mac objectively got the better of the opening, but at the cost of using a great deal of time. As a result, in a very complicated middlegame, he was too low on time to find the best moves and I was able to wriggle out to a completely even endgame. But by then I was low on time, too, and simply hung a rook — a rather disappointing finish to what was quite an exciting game.
It’s interesting to see how the psychology shifted in game two. Mac played a very unambitious opening as White, but moved rapidly and did not get in time pressure. I felt pressure to “make something happen,” and played a reckless piece sacrifice. Very surprisingly (to me), Mac again did not handle the unexpected complications very well, and there was one fleeting moment when I could have either gotten my material back or gotten full compensation for the piece. But we suffered from a “mutual delusion,” in Mac’s words: Because I had sacrificed to obtain an attack on the kingside, neither of us saw my counterplay on the queenside. Unfortunately for me, the window of opportunity was brief. I missed my chance, and then the rest of the game was very easy for him.
Notes by Mac are given with the identification (MM), and notes by me are identified by (DM).
Mackenzie Molner — Dana Mackenzie
1. e4 e5 2. Nf3 Nc6 3. d3 …
Whaaat? In recent years there has been a trend to less and less ambitious play by White in double e-pawn openings. In the past White almost always strove for the d2-d4 pawn break, but now it is very fashionable in the Ruy Lopez to settle for d2-d3. With this move, Mac takes it one step farther and “settles” for d2-d3 on the third move. But when you think about it, there is nothing wrong with this move. It would be absurd for Black to try to “bust” it. (DM)
I went into the second game with a bit of a mindset adjustment compared to the first game. I wanted to make sure that I did my best to avoid unnecessary time pressure. … This already popped up as early as the move 3. d3. This is an idea I’ve been experimenting with a bit lately. I didn’t want to get involved in a well-explored opening line and thought that playing a reversed Philidor would be an easy system to play. Objectively this is definitely not the most pressing way to play, but for the sake of a rapid game I thought it could work out well. (MM)
3. … Nf6 4. Nbd2 g6
Maybe a more “classical” answer would be 4. … d5, but I was wary of overreaching. If Mac can take his time, I figured that I could also take my time, deferring my decision about whether to play … d5. (DM)
5. Be2 Bg7 6. O-O O-O 7. c3 d5
I thought that Black might be interested in playing the move 7. … a5 to limit White’s queenside expansion. It’s definitely not forced, but I thought it would be a good practical move that forces White to deviate from an easy plan. (MM)
As you can see, I was stuck in a mental rut and thinking more about the … d5 break. I underestimated White’s idea of playing b2-b4, which I saw more as a weakening move. In fact, it did turn out to be a weakening move, but only after some twists and turns that were highly un-forced and unexpected. I think that if I were to play this position again, I would probably take Mac’s advice and play 7. … a5 as prophylaxis. (DM)
8. b4 a6 9. Bb2 Re8 10. Re1 de 11. de Nh5
Trying to provoke a weakness in White’s pawn structure. (DM)
12. g3 …
Weakness provoked. Now what? (DM)
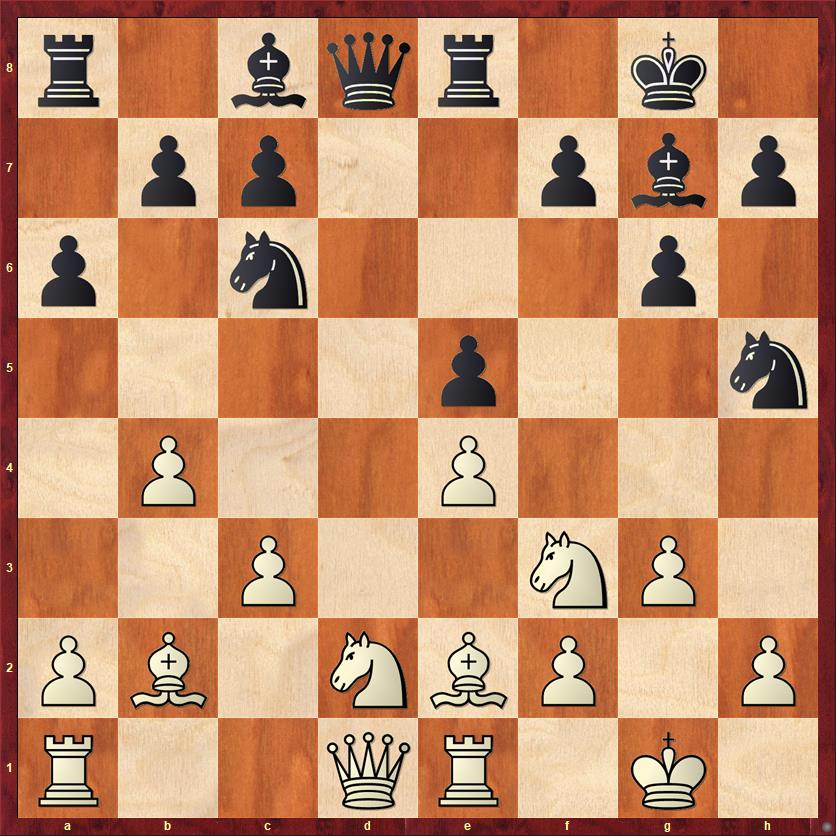
FEN: r1bqr1k1/1pp2pbp/p1n3p1/4p2n/1P2P3/2P2NP1/PB1NBP1P/R2QR1K1 b – – 0 12
Here Black has lots of reasonable moves. The most reasonable, to me, are to finish developing with 12. … Bh3 or 12. … Bg4. The latter move sets a trap: if White tries to win a pawn with 13. Nxe5? Nxe5 14. Bxg4 Nxg4 15. Qxg4, he leaves his knight hanging to 15. … Qxd2. If I had seen this idea, I might have played it — not so much because I would expect Mac to fall into the trap (I’m sure he wouldn’t) but because Bg4 puts a little bit more pressure on White’s position than Bh3. (DM)
12. … Bf6?
This is just a weird move that doesn’t improve my position in any way. I played it to prevent 13. Nh4, but there was no need to prevent that! It’s easily met by … Nf4. Also, I was thinking about preparing a flight square for the knight on g7, and from there he could go to e6. But why? What is the point of spending four tempi on this redeployment? I just was not thinking clearly. (DM)
I was surprised to see the move 12. … Bf6. I figured the knight on h5 might try to reroute to e6 through g7, … but it just seemed to me like that plan might be too slow. (MM)
13. Qc2 Bh3 14. Nc4 Qc8
The high point of the game occurred after Black’s 14. … Qc8. I have to admit that I didn’t fully appreciate what Black was up to here. I was playing on positional feel up to this point but the move I played in the game, 15. Ne3, required much more accurate calculation that I only started to do after I played it. I thought that bringing the knight towards the d5 square would be valuable, and the knight on e3 also covers some kingside squares. It only dawned on me after playing the move that Black’s idea may have been to play … Nf4 in an attempt to open up the kingside, now that Black’s queen has access to the g4 square. I began to hope that … Nf4 wouldn’t appear on the board so that I could have a second chance to deal with this plan, but then it appeared immediately on the board! (MM)
I sympathize with Mac, who found it hard to figure out what I was planning to do. The reason is that I was finding it hard myself! The move … Nf4 was kind of a spur-of-the-moment impulse. It looked as if it might work, and rather than letting Mac play Nd5 and dominate the position, I decided to make things completely chaotic. Also, remember that this is a rapid game. Probably in a tournament game I would have played with more restraint. (DM)
15. Ne3 …

FEN: r1q1r1k1/1pp2p1p/p1n2bp1/4p2n/1P2P3/2P1NNPb/PBQ1BP1P/R3R1K1 b – – 0 15
15. … Nf4?!
I’ll be honest, after the game I was kicking myself for playing this move. It’s an example of “hope chess,” as in “I sure hope that this works.” Well, no, as a chess player it’s your responsible to figure out whether it works. (DM)
Once 15. … Nf4 was played, it certainly seemed like a critical point in the game. I thought that I needed to capture it on positional grounds, but the question was how dangerous is the oncoming attack going to be. I began to calculate a lot of variations around the idea of 16. gf ef 17. Ng2 with the expectation that … Qg4 was coming next. I liked the fact that I had 18. Nfh4 with tempo. I thought at that point that 19. Bc1 looked annoying for Black, because it tied up the f-pawn and could help bring another piece into the defense of the kingside. There were still several ideas that Black could try there, but it seemed worth it to capture the knight on f4 and enter into these complications. (MM)
16. gf ef 17. Ng2 Qg4
I did consider 17. … g5 also, which threatens to play 18. … Bxg2 19. Kxg2 g4 winning back the piece. But White’s defense 17. … g5 18. Nd4 Ne5 19. f3 is just too solid. There’s no way that Black has enough compensation here. (DM)
18. Nfh4 Qg5
A weird position where both sides have a lot of pieces in less than ideal positions. I’d like to have my queen anywhere other than g5, because I’d like to threaten his knight on h4. His knights are self-defending at this point, but extremely vulnerable to attack. Who will repair the defects in their position first? (DM)
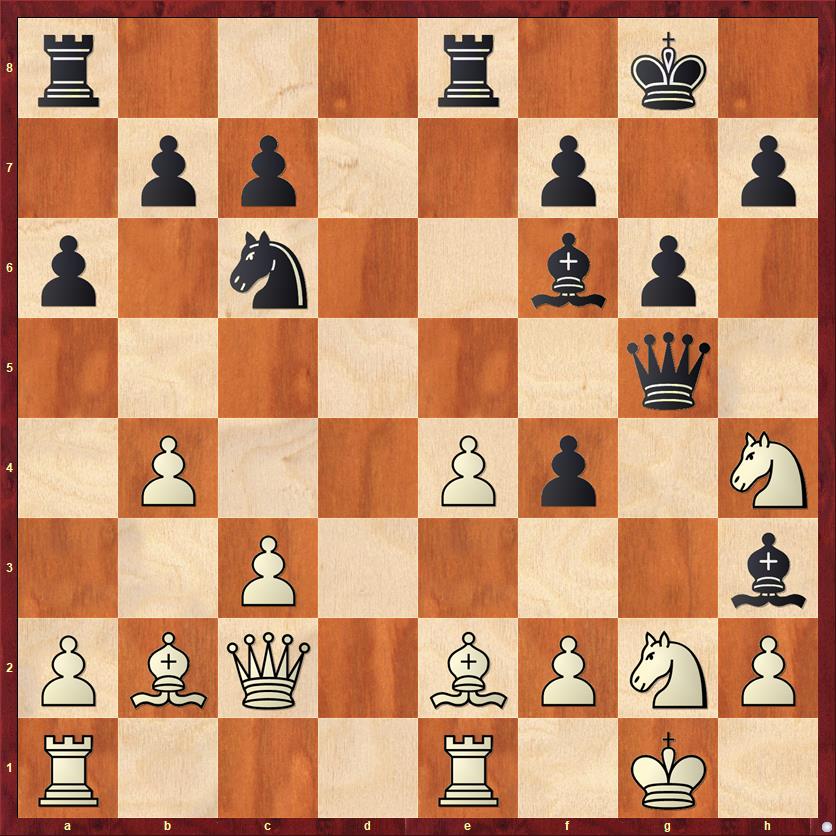
FEN: r3r1k1/1pp2p1p/p1n2bp1/6q1/1P2Pp1N/2P4b/PBQ1BPNP/R3R1K1 w – – 0 19
19. Bc1? …
An out-and-out mistake by a grandmaster — something that doesn’t happen too often. I was expecting 19. Qd3, which is complicated, but I think good for White. After 19. … Bxg2 20. Nxg2, Black has a choice. I could win a pawn with 20. … Nxb4 21. cb Bxb2, but objectively that is not enough to equalize: I have only two pawns for the piece and my “attack” is mostly a figment of my imagination. More interesting is to try to keep the initiative going with 20. … Ne5 21. Qh3 f3 22. Bxf3 Nd3. All of a sudden Black’s threats are looking extremely dangerous! But now 23. Bc1! comes just in the nick of time. After 23. … Qe5 24. Rd1 Qxc3 25. Be3, the fog of combat is starting to clear and White is probably going to emerge in control. Black might get three pawns for his piece, but White’s pieces are now better organized. (DM)
I was pretty satisfied with how the game was going up to the point of 19. Bc1. Even during the game I thought everything should be good here. I reviewed the game afterwards and noticed that Black has 19. … Qe5! with annoying counterplay against the c3 pawn and a1 rook. I noticed that this type of idea was possible during the game but didn’t appreciate how strong it was. I imagine that we were both so focused on all the possibilities on the kingside that we shared some kind of mutual delusion here that all moves must involve furthering Black’s attack on that part of the board. (MM)
What a great comment by Mac! Yes, “mutual delusion” sums it up perfectly. Both of us failed to grasp that Black has play on both sides of the board, and this is what (almost) justifies the piece sacrifice. After 19. … Qe5 20. Bxf4 Qxc3 White has a dizzying number of problems: his queen is hanging, … g5 is threatened, the pawns on e4 and b4 are weak, and there is also … Nd4 to worry about. According to the computer, 21. Qxc3 Bxc3 22. f3 Nxb4 is equal, but I would say it’s kind of an iffy equality — I would rather play Black here. (DM)
19. … Qh6?
Tunnel vision, focusing only on the kingside. Also, I missed White’s 21st move. (DM)
This move lets me get things under control on the kingside. (MM)
20. Bxf4 g5 21. Bd2! …
Somehow I had only analyzed 21. Bxc7. Now my goose is cooked. (DM)
21. … Be5
Also insufficient is 21. … Bxg2 22. Nxg2 Be5 23. h4, and White has succeeded in shutting down Black’s attack. (DM)
22. Nf3 Rad8 23. Bxg5 …
The last important decision was 23. Bxg5, which has the potential to open up the kingside a bit. But after 24. Bf1 everything is defended and the plan of bringing White’s dark-squared bishop to g3 could bring a permanent end to Black’s attack. (MM)
23. … Qg7 24. Bf1! Bxc3 25. Bxd8 Bxa1 26. Bxc7 Re6 27. Bg3 Bd4 28. Nf4 Black resigns
Summing up the two games of our mini-match, the most surprising thing to me was that in both games I was able to come back from semi-unsound opening play and make a real game of it. A good lesson from this is that grandmasters are human and can make mistakes, too, so you shouldn’t shy away from complications.
On the other hand, if the match were to continue (and I hope it will!) I would not be able to survive playing game after game in this style. Impulsive moves like 15. … Nf4 are not a path to winning chess. It was kind of a fluke that the piece sacrifice did work, or could have worked, thanks to Mac’s mistake on move 19. At the very least, the sacrifice needed more careful and objective analysis. I also needed to keep sight of the whole board so that I could shift the attention to the queenside at the critical moment with 19. … Qe5!


