Generally speaking, when you are in a bad or losing position, you should not count on finding a single miraculous move — a hail Mary — to save your position. Hard-nosed, patient defense will save more games than prayers will. But on the other hand, you should keep an eye out for the rare case where Mary appears. The more miraculous the miracle is, the more likely that you will miss it… and your opponent will, too.
When I was going over the games from my most recent tournament, I ran into an unbelievable example of a hail Mary: A single move (found by the computer) that reverses the evaluation of the position from lost to won. Not to keep you in suspense any longer, here is the position.
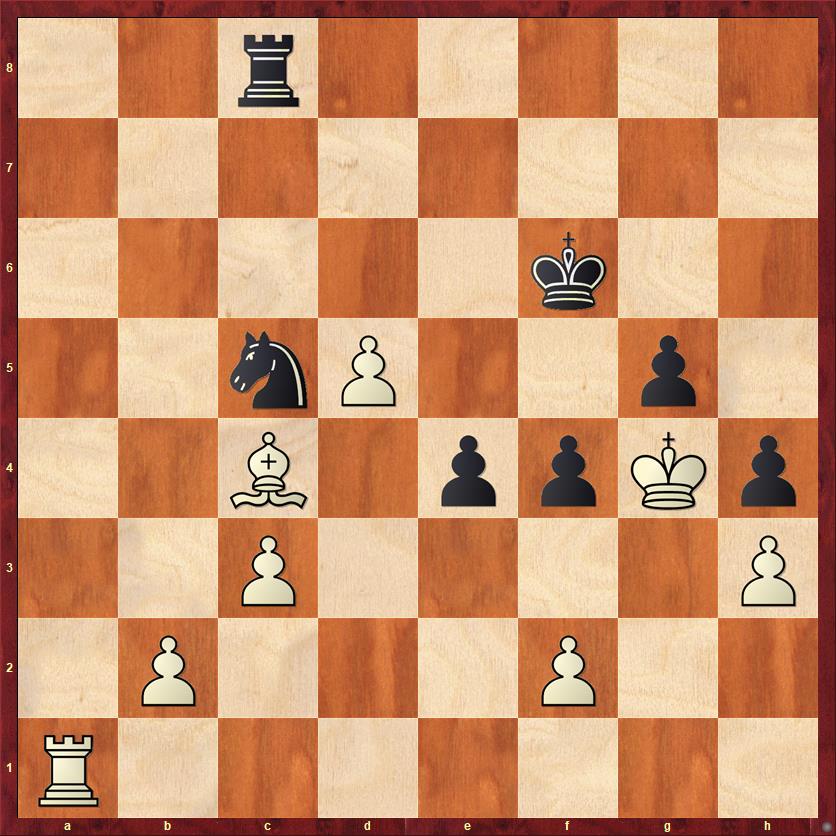
FEN: 2r5/8/5k2/2nP2p1/2B1ppKp/2P4P/1P3P2/R7 b – – 0 38
I’m Black, playing against an expert named Vincent Qin in my first tournament game for over two years. I’ve just sacrificed a pawn, and yes it was a deliberate sacrifice even though I didn’t see the point of my own sacrifice. It’s Black to play and win. Good luck!
When I analyzed this game without a computer, I thought I was already lost at this point and that my pawn sacrifice was just a wild attempt at a cheapo. That’s what I thought during the game, too. When I saw the computer’s move here, I at first did not understand it. If you want a hint, here is one: think about mating nets.
Have you figured it out? First, here is the move that I played:
38. … Ke5??
I was hoping for something like 39. Kxg5??, when 39. … e3 would give me serious drawing or winning chances. The threat is … Ne4+, and if White tries to get out of that with 40. Kxh4?? he’s in a mating net after 40. … Kf5. The first of many mating nets we’re going to see! However, Qin played the best move:
39. Ra7 Nd3
This is almost good enough but not quite. Unfortunately, it’s not even very hard for White to calculate the winning line.
40. Bxd3 ed 41. Re7+ Kxd5 42. Rd7+ Kc4 43. Rd4+! …
The key point. White separates the Black king from the pawn, and even though I am able to gobble up all of White’s queenside pawns, he easily wins on the kingside.
43. … Kb3 44. Rxd3 Kc2 45. Rd5 Kxb2 46. Rxg5 Kxc3 47. Kxh4 Kd4 48. Kg4 …

FEN: 2r5/8/8/6R1/3k1pK1/7P/5P2/8 b – – 0 48
We can stop here. White is going to win the f-pawn. In some cases, the endgame K+R+f+h versus K+R can be tricky for White to win… but this is not such a case, because my king is cut off from defending against the passed pawns. Qin played the endgame impeccably and I resigned on move 60.
Now let’s go back to the first diagram and see how I could have not just saved a draw, but won the game!
38. … Kg6!!
When I first saw this move popping to the top of the computer evaluation, I thought it had to be a typo. It seemed completely illogical to me. What is the threat? Can’t White just chase my knight away, play a check on a6, and chase my king back to the seventh rank? I thought that the only conceivable way to save the game would be to move my king forward (as I did in the above variation, to no avail). I couldn’t see any possible point to moving it sideways or backward.
The flaw in my thinking, and the reason I missed this hail Mary move, is that I forgot about checkmate. I think that this is actually a very common mistake that rears its head in multi-piece endgames. You think that it’s the endgame, so there is no way that your king can be in danger any more. You charge your king out into the middle of the board, as Qin has done here, putting it on g4. And then, before you know it, the gate snaps shut…
So the point of 38. … Kg6!! is simply to set up a mating net. The threat is … Nd7 followed by … Nf6 mate. The line that I just mentioned, 39. b4 Nd7 40. Ra6+, is refuted by 40. … Nf6+ — defending a check with a check! White has to give up the exchange with 41. Rxf6 Kxf6, and then the game is easily won for Black.
But there’s more! You might think that after 38. … Kg6, 39. Bb5 would be a pretty good try for White, keeping the knight out of the crucial d7 square. But then it turns out that Black has another mating idea: 39. … f3!! 40. b4 Rf8! and there is no defense to … Rf4 mate.
And finally, there is one other point to the combination. It looks as if White might at least be able to bail out to a draw after 38. … Kg6!! 39. Re1! Nd7 40. Rxe4. If Black plays 40. … Nf6+? 41. Kf3 Nxe4 42. Bd3!, White has a whole raft of pawns as compensation for the exchange. But Black has a much more convincing move: 40. … Rxc4!, deflecting White’s rook. Now 41. Rxc4? Ne5 is, once again, checkmate! Or if 41. Kf3 Black wins with 41. … Rxe4 42. Kxe4 g4!! and White’s king cannot get back in time to stop Black’s h-pawn.
I am just blown away by the way all of these tactics fit together, just as if I had planned them… and yet I had no inkling of any of these possibilities during the game.
The computer’s hail Mary kind of undermines the lessons I thought I had learned from this game. I won’t bore you with the first 38 moves, but over and over I had good active moves that I passed over in favor of more passive moves that (I thought) would lure my opponent into creating weaknesses. This is not my usual style of chess. To me, the lesson from the game was clear: I lost because I didn’t have enough courage to play the active moves. But when I went over the game on the computer, it said that none of my mistakes was actually a mistake. In particular, the pawn sacrifice that led to this position was perfectly sound. (That was an active move, which I had thought was a last-ditch gamble, forced upon me by my previous passivity.) To the computer, the reason I lost was not that I lacked courage, but that I lacked imagination at the critical moment.
The only conclusion: I lacked courage AND I lacked imagination. That’s a couple of gut punches.
Lessons:
- Imagination can make up for failures in other parts of the game. But it’s foolish to count on it!
- In multi-piece endgames, never forget about the possibility of mating nets. Many players let their guard down when the endgame arrives.
- Study your games without a computer first, then with a computer. You will often draw different lessons, and they are both valuable. If you study the game with the computer first, you will not be completely able to look at it “with human eyes,” recreating the conditions under which you had to play the game.


