As I wrote in yesterday’s entry, I had another interesting game with the Radchenko Variation of the Two Knights Defense yesterday. It’s funny, after playing this line only three times in 20 years, I have had two chances to play it this year. Unfortunately, they both ended in losses for me.
For those of you who are unfamiliar with the Radchenko Variation (actually a subvariation: the hierarchy goes Two Knights Defense → Fritz Variation → Radchenko Subvariation), it’s this berserk line where Black sacrifices a piece on move 9 in the hope of a speedy checkmate. If you want to learn more about it, check out my earlier post, “Are You Rad Enough?”
So my game against Gregory Young yesterday started as follows:
Gregory Young — Dana Mackenzie, CalChess State Championship 2009
1. e4 e5 2. Nf3 Nc6 3. Bc4 Nf6 4. Ng5 d5 5. ed Nd4 6. c3 b5 7. Bf1 Nxd5 8. Ne4 Qh4 9. Ng3 Bb7!?
This initiates the Radchenko Variation. Black ignores the threat on his knight and just develops as rapidly as possible.
10. cd O-O-O 11. Bxb5? …
This is too ambitious. White is already up a piece, and he doesn’t need to snatch this pawn. Better is 11. Be2, with the idea of putting up a fight for the white squares. Also good, if you are a computer, is 11. de.
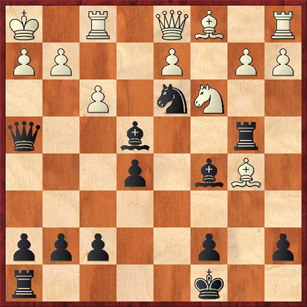
11. … Nf4 (diagram 1)
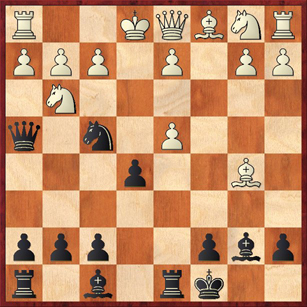
Mad Tactics 1: Why would 12. O-O be a disastrous mistake for White?
Gregory saw the trap, and played 12. f3 instead. At this point I thought for about 45 minutes, because I have never actually studied this position before. The main question was whether I should play 12. … Nxg2+. At first it seems obvious that I should — why not win a pawn with check and flush White’s king out in the open? In a blitz game I would have played this with no questions asked. Unfortunately, I talked myself out of it for two reasons: 1) After 13. Kf2 I saw nothing better than 13. … Nf4, which seemed like a loss of tempo, and 2) I convinced myself that I had a better move (see below). It turns out that I was wrong, and so it’s really important to ask what is going on after 12. … Nxg2+ 13. Kf2 Nf4.
First of all, I should mention that the computer considers the position as equal. That’s really big. If White is a piece ahead in material but the computer says that the position is equal, that really means that White is in huge trouble. Black has a full piece worth of compensation, and White will have to play like a 2900-rated computer just to survive.
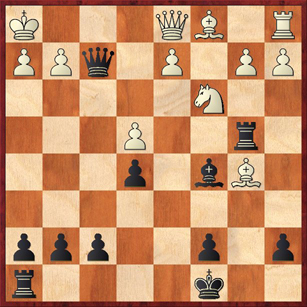
In the post-mortem we didn’t have a computer available, so we looked at the natural continuation, 14. d3 Rxd4 15. Be3. (Diagram 2)
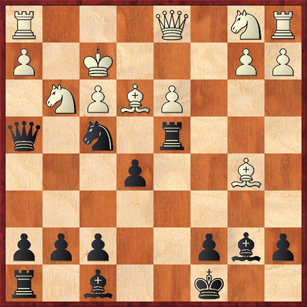
Mad Tactics 2: What is Black’s killer move in this position?
Like a lot of the tactics below, this one was found by the computer. In the post-mortem the move we analyzed was 15. … Bc5, which is okay, but after 16. Qc2 Bb6 17. Nc3 it’s still a fight. Black has something better than this.
Unfortunately, instead of playing the obvious 12. … Nxg2+ I convinced myself that 12. … Rxd4? was better, and that is the move I played. This was really the losing move. My thinking was that White couldn’t castle because he would get checkmated, and if he can’t castle then Black is going to have a chance to play … Nxg2+ under even better circumstances.
However, my opponent was smarter than I was, and brave too. He played 13. O-O! Bc5 14. Kh1. (Diagram 3)
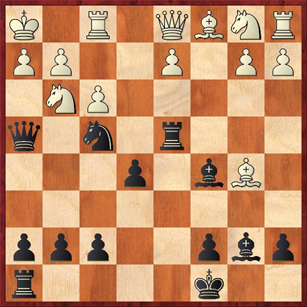
Mad Tactics 3. Why can’t Black sacrifice his queen with 14. … Qxg3? Can he instead play 14. … Nd3, planning to sacrifice his queen with 15. … Qxh2+?
Don’t laugh! Both of these tactics have to be taken seriously. The main point is that White’s king is very nearly in a mating net; all Black needs to do is pry open the h-file somehow and then play a rook check.
One other possibility for Black, which we looked at in the post-mortem, is 14. … Nh5. Notice that 15. Nf5? would now be a terrible blunder for White. (See Diagram 4.)
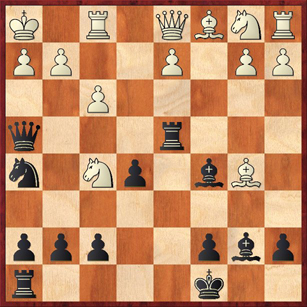
Mad Tactics 4. Black to play and win.
However, instead of falling for this trap, White can simply take on h5. After 15. Nxh5 Qxh5 I wasn’t convinced that Black had enough compensation. The computer backs this up, although it’s trickier than I thought. The computer recommends 16. Qe2 Rh4 17. g4! (Not 17. g3 when 17. … Bxf3+! draws — actually, this would also have been a good “Mad Tactic.”) Black wins a pawn with 17. … Qxg4 but White gains time to play a crucial piece trade with 18. Ba6! Qh5 19. Bxb7+ Kxb7. Still, this would have been a good line for me to try, because it’s questionable whether a human would find moves like 17. g4! and 18. Ba6!
After considering all these options (14. … Qxg3 and 14. … Nd3 and 14. … Nh5) and concluding that none of them worked, I played another move that I thought was a clever nuance: 14. … Rb4. The idea is to gain a tempo with the attack on White’s bishop on b5, while getting the rook away from the square d4, where it can be forked. Now after the obvious 15. Nc3 I played 15. … Nd3 and felt really smart, because White cannot accept the piece sacrifice. However, Greg calmly continued 16. Nge4! Bxe4, reaching the position in Diagram 5.
Mad Tactics 5. Find two different ways that White can win back the piece.
Maybe this question requires some explanation. The move that Greg actually played was 17. fe, which temporarily wins back the piece but then loses the exchange to 17. … Nf2+. Now in reality, there was nothing wrong with Greg’s move. It was a solid, simple, human move, and it conforms to the adage that the way to refute a sacrifice is to accept it and then return some or all of the accepted material. Because I was a piece down to begin with, after 18. Rxf2 Qxf2 I was still down material, two pieces for a rook, and my attack was beginning to dwindle away. However, because we are practicing tactics today, I’m asking you to find two ways that White could have won back the piece in diagram 5 without even conceding the exchange. (Both of these variations are courtesy of the computer.)
Okay, getting back to the game, here is the position after my move 18. … Qxf2. (Diagram 6.)
Mad Tactics 6. What is White’s best move if White is a human? What is the best move is White is a computer?
Here we’re really going off the deep end, which always seems to happen when you analyze with a computer. The move that Greg played was 19. Qf1!, which is absolutely the correct move to play if you are a human. If 19. … Qxf1 20. Bxf1 White just needs a few more moves to consolidate (for instance, a3, Nd4, d3, and Bd2), and eventually his material advantage will make its presence felt. This is a very good example of how to defuse an attack by giving back some material and trading pieces. I felt that I had no chance to save the game if I traded queens, so I played 19. … Qd4. But my pieces on the queenside are too tangled up, and in particular that rook on b4 looks really sick. The game continued 20. d3 Kb7? 21. a3 Rb3 22. Bc4 Rb6 23. Nd5! and White wins back the exchange or else wins the queen with 24. Be3. The rest of the game was an easy mop-up operation for White.
So we know what the right human move is in Diagram 6. But ironically, the computer considers Greg’s move 19. Qf1 to be a blunder, which reduces White’s advantage from 3 pawns to 1 pawn! As explained above, the computer is WRONG WRONG WRONG. However, just to see if you are truly a mad tactical genius, can you figure out the variation that the computer prefers?
All in all, an impressive game by Greg, who made one rash move (11. Bxb5?) but kept his cool very nicely for the rest of the game.
Answers to Quiz Questions.
1. As mentioned in my earlier blog post, 12. O-O loses to the stunning queen sac, 12. … Qh3!!
2. The killing move for Black is 15. … Nd5!! The point is that if White takes the rook with 16. Bxd4, then after 16. … Qxd4+ White has no good square for his king. Either g2 or f1 allow a fork on e3, and either e2 or e1 allow Black another fork with 17. … Qxb2. If White leaves the bishop on e3, then after 16. … Nxe3 his king will be utterly exposed on the dark squares. And finally, if 16. Bd2 Bc5 White will again be dying on the dark squares.
3. The queen sacrifice 14. … Qxg3? 15. hg Rd6 fails to 16. d4! (the only move, but it’s good enough). After 16. … Bxd4 White gives the queen back with 17. Qxd4! and then picks up the knight as an extra bonus. The alternative 14. … Nd3 fails to 15. Nf5!, which prevents the queen sac on h2 because the knight defends the checking square on h4. Also, if Black takes the exchange with 15. … Nf2+ 16. Rxf2 Qxf2, White wins it right back with 17. Nxd4. The main point of my move 14. … Rb4 was to improve on this variation. Unfortunately, I didn’t improve enough!
4. In this case White’s move 15. Nf5? doesn’t work because of the paradoxical 15. … Ng3+!! White moved his knight away from g3, and Black sacrifices a piece just to make it move back! Now 16. Nxg3 is forced, and 16. … Qxh2+ 17. Kxh2 Rh4 is mate. What a lovely combination! Unfortunately, the Radchenko Variation entices you with stuff like this and then breaks your heart because White comes up with better alternatives.
5. Option (a) is 17. Ba6+ Bb7 18. Bxd3. I can’t believe that neither my opponent nor I saw this simple deflection maneuver. Actually it’s a combination of an intermezzo and deflection. If Black doesn’t play 17. … Bb7, then White can take on e4 with his knight, because the bishop no longer hangs. Option (b), somewhat more complicated, is 17. Nxe4 (White takes with the knight anyway!) Rxb5. Seemingly Black has won a piece, but the rude awakening is 18. Qa4! Now a discovery is threatened (19. Nd6+, winning Black’s queen), so Black has to play 18. … Rb4 19. Qa6+, and the fork picks up the knight on d3.
You might wonder whether it’s worth looking for these lines when, as the game shows, 17. fe was clearly good enough. I think that you should look for them, if you have time. Bobby Fischer, in particular, was one player who would mercilessly and ruthlessly exploit these tactical tricks — remember his famous line about “the scorpion’s sting at the tail end of the combination.”
6. The computer insists on the move 19. a3. Of course I looked at this move, and was not at all afraid of it because I can play 19. … Rb3, and the rook can’t be taken because of mate on g1. My analysis stopped there, and I’m sure that Young’s analysis did too. But the computer always goes deeper, and looks for the “scorpion’s sting.” In this case, 20. Ba6+! is a killer, because Black has no good square for his king. If 20. … Kb8 21. Qxb3+ snags the rook with check, so Black doesn’t get to play … Qg1 mate. If 20. … Kd8 21. d4! Bxd4 22. Bg5+! allows White to develop his bishop with a tempo, so now the back rank is guarded and the rook on b3 can be safely taken. Finally, if 20. … Kd7 White plays 21. Bc4! (as in the game) Rb6 22. Na4! and we see the final insidious point: Black’s answer 22. … Rg6 is no longer effective because 23. Nxc5+ removes Black’s key attacker. What an amazing line — intermezzos left and right! Computers are very good at finding in-between moves; humans tend to be not diligent enough about pursuing such variations to the end.
Even after seeing this computer analysis, though, I still think that Greg’s decision to play 19. Qf1 was completely justified. It’s safe and sound, while the other line demands precise calculation.


