In yesterday’s ninth round of the Berkeley International, both the norm picture and the prize picture became a lot clearer. The Georgian GMs, Kacheishvili and Izoria, continued their domination of the event with smooth victories. In the games with norm implications:
- Krush and Friedel drew, which effectively takes Krush out of the running for a GM norm.
- Rensch beat Kustar. Rensch likely had already qualified for an IM norm, but this removes all doubt.
- Esserman drew with Haessel. This should be enough to clinch an IM norm for Esserman.
- Zenyuk lost to Kacheishvili, so she has not qualified for an IM norm yet. I would think that she still has a shot at an IM norm if she wins today, but that is based only on common sense. In the world of international chess, as we know, common sense seldom rules.
Finally, what is the prize outlook? To answer that question, here are the standings:
- Kacheishvili: 7
- Izoria: 6.5
- Krush: 6
- Friedel: 5.5
- Rensch: 5.5
- Bhat: 5
- Sarkar: 4.5
- Sharavdorj: 4.5
- Pruess: 4.5
- Esserman: 4.5
- Zenyuk: 4.5
- Kraai: 4
- Milman: 4
- Naroditsky: 3.5
- Haessel: 3.5
- Kustar: 3
- Evans: 3
By the way, I have not attempted to compute any tiebreaks; I’ve listed the tied players in the order of their pre-tournament rating.
I think that Kacheishvili and Bhat will probably draw today, and Izoria will probably beat Zenyuk, which will create a tie between Kacheishvili and Izoria for first place (as I predicted several entries ago!). Rensch will probably win the under-2400 prize, and Zenyuk will probably win the under-2300 prize. I’m predicting Krush for third, Friedel for fourth, and some massive tie for the under-2500 prize.
Okay, now let’s look at some games. Instead of showing you the complete games, this time I’m going to show you three positions that struck me as especially interesting.
The first is Izoria-Sharavdorj, after Izoria’s 36th move (36. Rd7). (Sorry that I have the board turned around, so we’re looking at the Black side.)
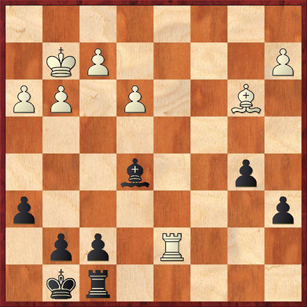
The next time someone tells you, “Bishops of opposite color endgames are drawish,” (or the next time you think it yourself) I want you to remember this position. Material is even, we have bishops of opposite colors … and the game is completely won for White! Why? Because Black can never free himself from the pin on the f7 pawn, and so he can never activate his rook. If Black loses the f7 pawn, the game will probably be a win for White because of his protected passed e-pawn. The only way Black can hope to free himself is to move the king to g6 and then push … f6 or … f5. But White prevents this by moving his pawn to h5. After that, there’s nothing for Black to do but sit and watch White’s pawns and king relentlessly march up the board. As for White, he doesn’t even have to think about anything until move 60. Here is how the game ended:
36. … Bc3 37. Rc7 Bd2 38. Rd7 Bc3 39. Rb7 Bb4 40. h4 g5 41. Kf3 gh 42. gh Kg7 43. h5 …
Black is dead.
43. … Bc5 44. Ke2 Bb4 45. f4 a5 46. Kf3 Bd2 47. e4 a4 48. Bd5 b4 49. Ra7 b3 50. ab ab 51. Bxb3 Bc3 52. e6 Bd4 53. Rd7 Bc3 54. Ke4 Be1 55. Bd5 Bh4 56. Ba2 Kg8 57. Bd5 Kg7 58. f5 Kg8 59. f6 Bg5 60. Kf5 …
And now a neat tactical trick to finish it off. (Sorry I messed up again … meant to save the position after Black’s 60th but I actually saved the position after White’s 60th. No matter, you should still be able to find the trick.)
60. … Bh4 61. Rxf7! Rxf7 62. Bxf7+ Kxf7 63. e6+ Black resigns
Our second position came up in the game Milman-Bhat. In this exciting game, Bhat sacrificed the exchange for a pawn on move 15. The computer suggests that Milman could have equalized, but not more. However, Milman didn’t find the best defense, and Bhat was able to win a second pawn. However, the situation remained very volatile indeed. Here is the position after Black’s move 31. … Qb4.
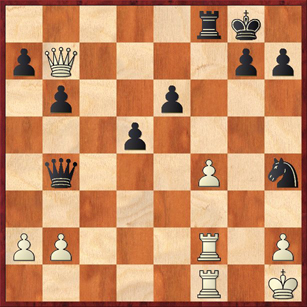
Can Black win after 32. Qxa7?
When I saw this position, I really thought that Vinay was bluffing. After 32. Qxa7 Qe4+ 33. Kg1 it looks as if White is in big trouble, but I couldn’t find any win for Black. If 33. … Rxf4?? (the obvious try) White has 34. Qb8+! and wins. This check on b8 is a real nuisance for Black. For example, if 33. … Rf6 (planning … Rg6+ followed by mate), White draws with 34. Qb8+ Kf7 35. Qc7+ and Black’s king either has to go to g6, blocking the rook, or he has to go back and acquiesce to a repetition of position. Likewise, queen moves for Black go nowhere. Both 33. … Qg6+ 34. Kh1 Qe4+ and 33. … Qe3 34. Kh1 Qe4+ just lead to a draw by repetition.
So, was Vinay bluffing? No! It turns out that after 32. Qxa7 Qe4+ 33. Kg1, Black has a winning move that I would never have found at the board, and I didn’t find in half an hour of home analysis either. It’s a simple, obvious move, and yet psychologically very difficult for a human to find. (A computer finds it right away.)
The answer is 33. … h6! Remember that the whole problem for Black in the above lines was the fact that his king couldn’t escape the queen checks. So all that Black has to do is create luft for his king, and his threats become indefensible. The fact that White can now take a second pawn on b6 is irrelevant.
Why did I have such a mental block about this move? The answer is something I gave a ChessLecture about a while ago. When you’re focused 100 percent on attack, attack, attack, it is very hard to detach yourself from that mindset and play a simple, quiet, defensive move (especially when it looks at first glance as if Black is just giving away all of his queenside pawns).
I’d be very curious whether Vinay saw 33. … h6 when he played his move 31. … Qb4. Probably the answer is yes, but if they were in a time scramble he might have played 31. … Qb4 just because the threat of … Qe4+ looked so strong. Likewise, Milman (who was in even worse time trouble) may have avoided taking the a7 pawn just on general principles.
The way the game actually ended (from the diagram) was 32. Re2 Qc4 33. Rg1 g6 34. Rxe6 Qd3! 35. Re2 Qxe2 36. Qxd5+ Kg7 37. White resigns
Our third and final diagram is from the game Rensch-Kustar. This is a great illustration of why you should never give up hope in chess. Kustar completely dominated the middlegame, and missed two or three easy wins. But Rensch kept on playing, and his patience was rewarded when Kustar played 54. … d3?? leading to the following position:
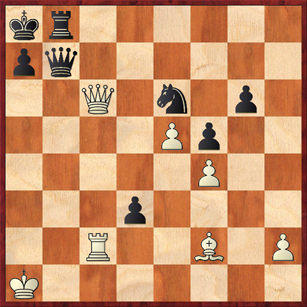
What did Black overlook?
If you don’t see it yet, here’s a clue: look for a way for White to threaten checkmate.
Got it? The winning move for White was the startling queen sacrifice, 55. Ra2! Black cannot stop the checkmate on a7 (or a6 or a5, if he pushes the pawn). Black resigned.
There was something Wile E. Coyote-ish about Kustar’s play in this game. He kept looking for ways to flatten the Roadrunner, but instead the anvil ended up falling on his own head. As for Daniel (Roadrunner) Rensch, sometimes it’s better to be lucky than good!


{ 4 comments… read them below or add one }
Dana,
I enjoyed your comments on the Berkeley event, which allowed me to keep up-to-date with my friend Marc Esserman’s progress.
I wanted to mention that in the game with the Bishops of opposite colors, I think that one mistake that many players make about these positions is to forget that when other pieces are on the board (like a pair of rooks), then the opposite colored bishops is not so drawish. In fact, it assists (usually the attacker, but I guess it could work the other way) one player, because suddenly the defender can never protect the squares under attack by the opponent’s bishop. I myself make this mistake in the middlegame to endgame transition and miss both winning and drawing opportunities by making this mistake.
Best,
Jason
Hi Dana,
Nice blog, and thanks for writing daily reports on the tournament!
Actually, I was going to play …h6 in that position. In general, my idea in that position was to try and improve all my pieces (I’m not going to win just by sitting tight and waiting for a blunder), and to do that, my king needed to be safe. So when I played …Ng6, I wanted to first tie him down to the defense of the f4-pawn, then make luft for my king, and then swing my rook along the 6th rank to attack. It was precisely with that plan in mind that I played …Ng6 and later …Nh4 to shut down his rooks. The fact my queen was chased away to a more active position only helped that plan.
Vinay
Hi Vinay,
Thanks for the info! I think I’ve discovered a blind spot in my thought process. I have no problem playing prophylactic moves like h6 before an attack, but once the attack begins — and especially after I’ve sacrificed material — I don’t even remember to look at such moves. It’s as if the sacrifice creates a sense of urgency or even panic in me, that I need to justify the sac *immediately*.
So when I analyzed the position after Qxa7, I already had my blinders on, and I only looked at the forcing moves: … Rxf4, … Rf6, and checks. I didn’t even look at calmly improving the position of my king with … h6.
After identifying that … Rxf4 and … Rf6 didn’t work because of back-rank checks, I should have logically proceeded to look at moves that take away the back-rank check threat. But I didn’t do that; I just said “… Rf6 doesn’t work” and stopped.
You must have overcome this mental block long ago (or maybe you never had it). I would be curious whether you have any conscious process that you go through to remain calm even after sacrificing material, and include quiet moves as well as forcing moves in your search tree. Or were there any games that particularly taught you this lesson?
I guess Krush crushed under the fact that she needed 2/2 for a GM norm. But then again, getting 2/2 is almost an impossible job if one doesn’t has 150-200 rating points more then the opposition and offcourse it’s totally impossible if the form isn’t there.
Thanks for the entries about this tournament. They were a joy to read.