For 1986, I’ve decided to show you yet another game I played against a fellow North Carolina champion. This series is becoming a who’s-who of North Carolina chess! First I showed you a game against Matt Noble (co-champion, 2002), then a trifecta of games against Greg Samsa (champion, 1981, 1982, 2002). My opponent for today’s game was John Kirby, who was state champion in 2005.
Another reason I’ve chosen this game is that I apparently played a theoretical novelty (TN) on move 9 that was both intentional and a solid improvement over existing theory. If so, it may be the first time I ever did that. However, I will leave it to my eagle-eyed readers to determine whether this claim is correct. In my last post, I wrote about a novelty that has been traditionally credited to Garry Kasparov, but reader Gerd Entrup pointed out that it had been played twenty years earlier by a Hungarian player, Peter Dely!
Alas, like Dely, my move had no effect on the chess world. But I do think it’s a good example of Dana’s Opening Philosophy, which I wrote about here a very long time ago. My philosophy is that amateurs should not play what the grandmasters play; they should do what the grandmasters do. That is, instead of slavishly copying the existing theory, they should instead be looking for alternatives to the current theory. That’s what grandmasters do: they look for new ideas to surprise their opponents with.
Fortunately, chess is a rich game that gives us many alternatives. In most positions, unless there are immediate tactics going on, there will be several options that are almost equally good. Often one or two of these will be the popular, “theoretical” moves, and the others will be seldom played. The advantage of choosing these moves is that your opponents will not have studied them, and they will be forced to use their own brains much sooner.
Whether or not it’s an official TN, I consider this game to be a pretty good example of Dana’s Opening Philosophy in action.
Dana Mackenzie — John Kirby, 7/27/1986
1. d4 Nf6 2. c4 c5 3. d5 b5 4. cb a6 5. e3 …
In the ’70s, the Benko Gambit took the chess world by storm. When White cooperates by taking on a6 and getting a pathetic pair of pawns on a2 and b2 that are targeted by Black’s whole army, it’s pretty good for Black. But by the ’80s White players had learned how to avoid this kind of torture. The “Modern Variation” 5. e3 (an amusing name for a variation that is at most four or five years newer than the “Classical Variation”) is one way.
5. … Bb7 6. Nc3 ab 7. Bxb5 Qa5 8. Bd2 Qb6
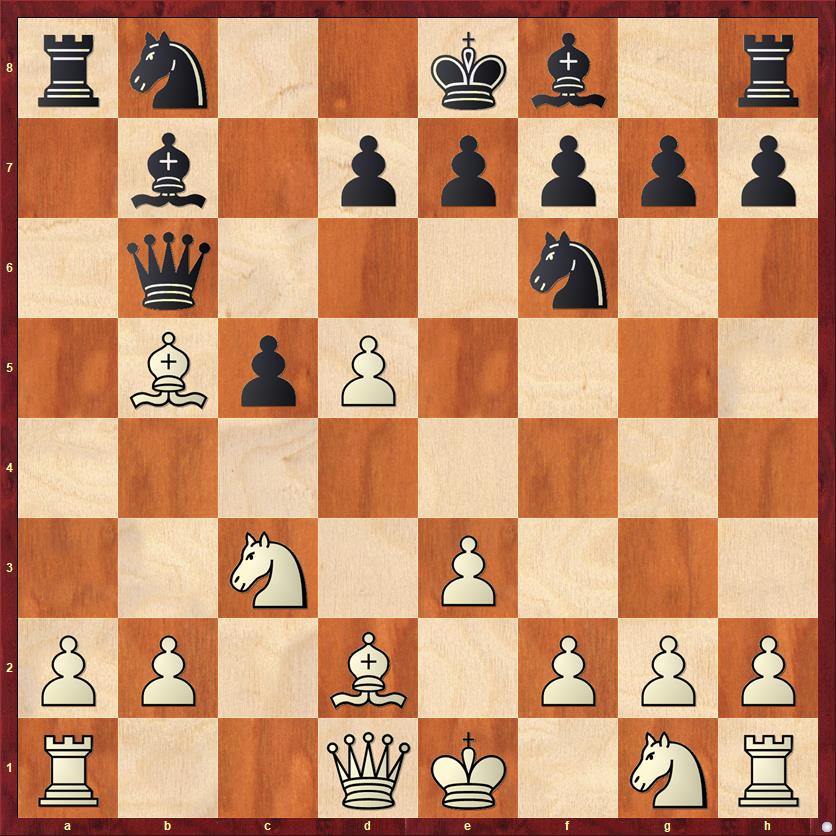
FEN: rn2kb1r/1b1ppppp/1q3n2/1BpP4/8/2N1P3/PP1B1PPP/R2QK1NR w KQkq – 0 9
This little two-step of the queen was introduced, I believe, by Lev Alburt in a game against Joel Benjamin in the 1984 U.S. Championship. He wrote about the line in Chess Life, so it was very topical when this game was played. Benjamin played 9. Qb3 and got steamrolled after 9. … e6.
I thought, why worry about defending the d-pawn? Why not just try to develop my pieces as quickly as possible? Black is going to fall behind in development and definitely have some awkwardness on the queenside. So step one of my home preparation was
9. Nf3! …
To my great surprise, when I got on Chessbase this morning to look up who first played this move, I did not find any games prior to my own! The first person to play 9. Nf3, according to Chessbase, was Lajos Portisch against the Cuban grandmaster Jesus Nogueiras at Reggio Emilia on January 3, 1987. So my game has priority by more than five months!
Perhaps more importantly, 9. Nf3 just seems to be a better move. According to Chessbase, it has scored 74 percent in tournament play, while 9. Qb3 has scored only 48 percent.
9. … Nxd5 10. Nxd5 Bxd5 11. Bc3?! …
This was step two of my opening preparation, offering a second pawn sacrifice. Black has two ways to take on a2. 11. … Bxa2? is just bad because of 12. Ba4! For example, if 12. … Bc4 13. Bxd7+ wins the exchange, and if 12. … Qe6 13. Bb3! wins a piece in view of 13. … Bxb3 14. Rxa8! Bxd1 15. Rxb8 mate! As you can imagine, this nifty piece of home analysis made me very eager to try out this line.
However, after 11. … Rxa2 I was not so sure. I wrote in my notes, “The critical line is 11. … Rxa2 12. Rxa2 Bxa2 13. Qa4 Bd5 14. Ne5! After 14. … Nc6 or 14. … Bc6 the exchanges on c6 lead to an endgame favorable to White, while on 14. … Qb7! White can try 15. f3. But Black may be able to equalize in this line.” Last week I checked this on the computer, and it backs up my assessment by 100 percent.
So it may in fact be true that 11. a4 is objectively better. And in any case, it’s moot for this game, because Kirby didn’t take the pawn sacrifice, and one move later the game transposes back into the a4 line.
11. … e6 12. a4 Be7! 13. O-O …
Interestingly, no one has ever played 13. Bxg7. According to the computer, Black equalizes with 13. … Rg8 14. Be5 Rxg2 15. Bg3 Qb7 16. Be2 Bb3! 17. Qd2 Bd5 and White has nothing better than repeating the position with 18. Qd1 Bb3 etc.
13. … O-O 14. Qe2 Qb7
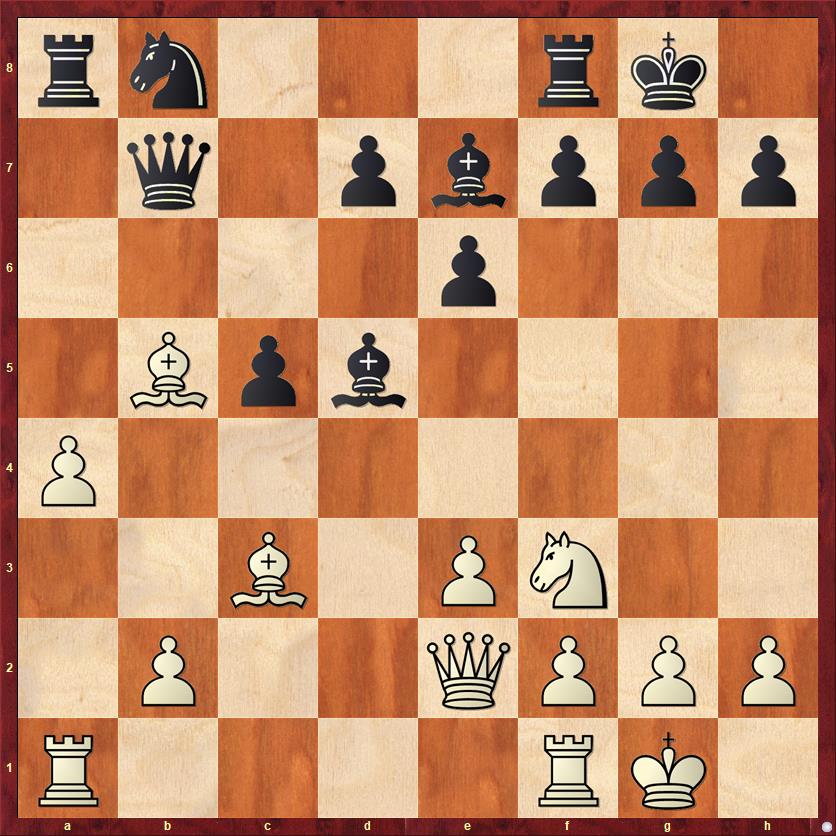
FEN: rn3rk1/1q1pbppp/4p3/1Bpb4/P7/2B1PN2/1P2QPPP/R4RK1 w – – 0 15
15. a5?! …
I am starting to realize that this was a typical sort of move for me at this point in my chess career. Especially when playing White, I habitually overestimated the importance of grabbing space, even when it weakened my position.
Take this move, for example. In what way does it improve White’s position? Previously the a-pawn and the bishop had a nice mutual protection society and did not require any help from other pieces. Now, both of them can become targets of attack. I am threatening to push the pawn on to a6, it’s true, but that threat is easily stopped. Perhaps the one good thing I can say about my move is that it induces Black to develop his knight to a6, which is probably not as good a square as c6.
According to Chessbase, the above position has been reached 9 times, and White has an excellent record of +5 -0 =4. If we count this game, you can make that +6 -0 =4. The most frequently played move here is 15. Nd2 (setting the obvious trap 15. … Bxg2?? 16. Qg4) but I kind of like the saucier move 15. Ne5!?, which has been played only once, by Martijn Dambacher of the Netherlands.
15. … Na6 16. Re1 …
I gave this move an exclam in my notes, but I don’t think it really deserves one. The move 16. Ne5 is still playable. Even though it looks a little bit looser than it did before, the computer still gives White a slight advantage after 16. … Bxg2 17. Rfd1 d6 18. f3! This is the sort of line that, in the pre-computer days, was hard to take seriously. In my notes I basically gave up and wrote: “16. Ne5?! looks premature because of 16. … Bxg2.”
16. … f5?
This move shows a fundamental misconception about the position. Best for Black is 16. … Bxf3 17. gf d5, mobilizing the central pawns as quickly as possible. Black’s true advantage in this position is his strong and mobile center pawn mass. Compare the resulting position with the line in the game, where the d-pawn only goes to d6 and the “central pawn mass” doesn’t really get going until it’s nine moves too late.
John’s misconception was that he was going to mate me on g2. He was so in love with that queen-bishop battery on the long diagonal that he did not want to give his bishop up for anything. We’ll see that misconception grow stronger in a couple moves.
17. Ne5! …
Finally! With a clear advantage to White.
17. … d6 18. Nd7 Bxg2
Kudos to Kirby for his attacking spirit. He’s not afraid to sac an exchange. But the attack sputters out surprisingly quickly, largely because no other Black pieces are participating besides the queen and light-squared bishop.
19. Nxf8 Bf3 20. Qf1 Qe4?!
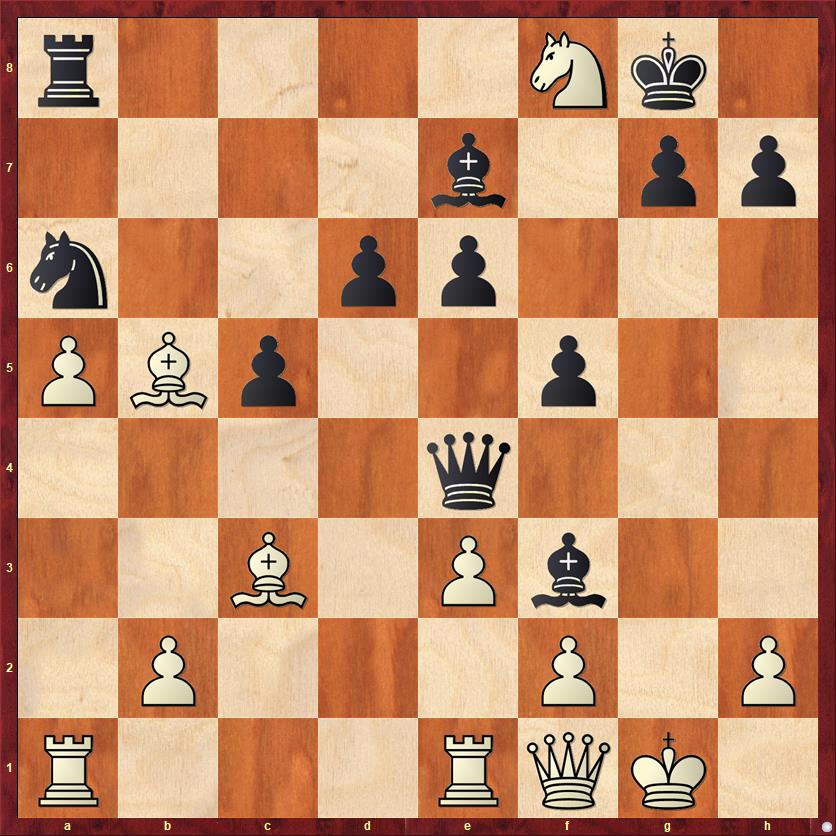
FEN: r4Nk1/4b1pp/n2pp3/PBp2p2/4q3/2B1Pb2/1P3P1P/R3RQK1 w – – 0 21
Black threatens mate in two, but the threat is easily defended and then his attack just evaporates.
21. Qh3 …
The computer prefers 21. h3, but I think this is a great move. It’s always nice to defend a mate-in-two threat with a mate-in-two threat! Black has to pause to take my knight on f8, and that gives me time to exchange off his best attacker.
21. … Bxf8 22. Be2 …
No muss, no fuss. After the bishops come off, White has a winning endgame.
22. … Bxe2 23. Rxe2 Nb4
Maybe Black should have tried 23. … Nc7 to keep queens on. After the queens come off the board, it’s even easier for White. Black gets an optically impressive knight on d3, but the knight threatens nothing and White’s long-range pieces easily work around it.
24. Qg2 Nd3 25. Qxe4 fe 26. Kg2 d5 27. f3 ef+
In my notes I gave this a “?!” because I thought that 27. … d4 was more challenging. But after that move, White can win in either of two ways. He can give the exchange back with 28. ed Nf4+ 29. Kf2 Nxe2 30. Kxe2, or he can hunker down and defend with 28. Be1 ef+ 29. Kxf3 Nxe1+ 30. R2xe1 d3 31. b3. Take your pick.
28. Kxf3 Bd6 29. Rg2 g6 30. Ke2 c4 31. b3 …
As Black’s pawn mass gets whittled away, White’s trump card — the passed a-pawn — starts to look stronger and stronger. It always gives me a certain amount of satisfaction to beat the Benko Gambit by pushing my a-pawn. It’s the most appropriate punishment for Black’s hubris on moves 3 and 4.
31. … Be5 32. Bxe5 Nxe5 33. bc Nxc4 34. a6 …
Ask not for whom the bell tolls. It tolls for the knight.
I was wondering, as I went over this game, why the endgame turned out to be so extremely easy for White. After all, there are many endgames where you can draw with a pawn for the exchange. But in this one, Black wasn’t even close to drawing.
I think that the main points are, first, that not all exchange-down positions are the same. In the endgame, the bishop can compete with a rook better than a knight can, because it can match the rook’s long-range scope. Second, White already had a passed pawn and didn’t have to work to create one. And third, White’s rooks are so much better than Black’s rook. In fact, I would venture to say that the biggest difference was not the difference in strength between a rook and a knight, but the difference in strength between an active rook and a passive rook!
34. … Kf7 35. R2g1 Ke7 36. Rgb1 Nd6 37. a7 Nc8 38. Rb8 Rxa7 39. Rxa7 Nxa7 40. Rb7+ Black resigns.
Lessons:
- In my opinion, you’ll learn more and have more fun if you don’t copy grandmasters, but instead look for solid, playable alternatives to the most fashionable, “theoretical” moves. Be your own person.
- A good kind of solid, playable alternative to look at is a developing move. A bad kind of alternative is a pawn move. If you find yourself playing a lot of pawn moves, you’re probably overestimating the value of space and underestimating the weak squares you’re creating.
- Don’t “fall in love” with a piece to such an extent that you lose your objectivity about the rest of the position.
- Generally speaking, your chances of drawing a B+P vs. R endgame (with other pawns and pieces on the board) are better than your chances of drawing a N+P vs. R endgame.
- Quality of pieces matters, too. Not all rooks have the same value.


