In recent weeks, as I mentioned before, I have been playing a series of training games against one of my students from the Aptos Chess Club, Atlee, who I think is about a 1500-rated player. Given the disparity between our ratings it’s no surprise that I have won every game so far, but the margin of victory has been getting narrower and narrower. As a trainer/teacher that makes me happy! Our last game was the most exciting one yet, and really I was very lucky to win this one.
I’ll skip the opening, which I botched very badly by playing what I call “hope chess.” This is when you sacrifice a pawn in the hope that you’ll get some compensation, but without calculating concrete lines. It’s a lazy man’s way of playing chess that I can often get away with against a lower-rated player, but it’s still bad chess.
This time I sacrificed two pawns, and after some further inaccuracies we got to this position. I’m White, and it is Atlee’s turn to move.
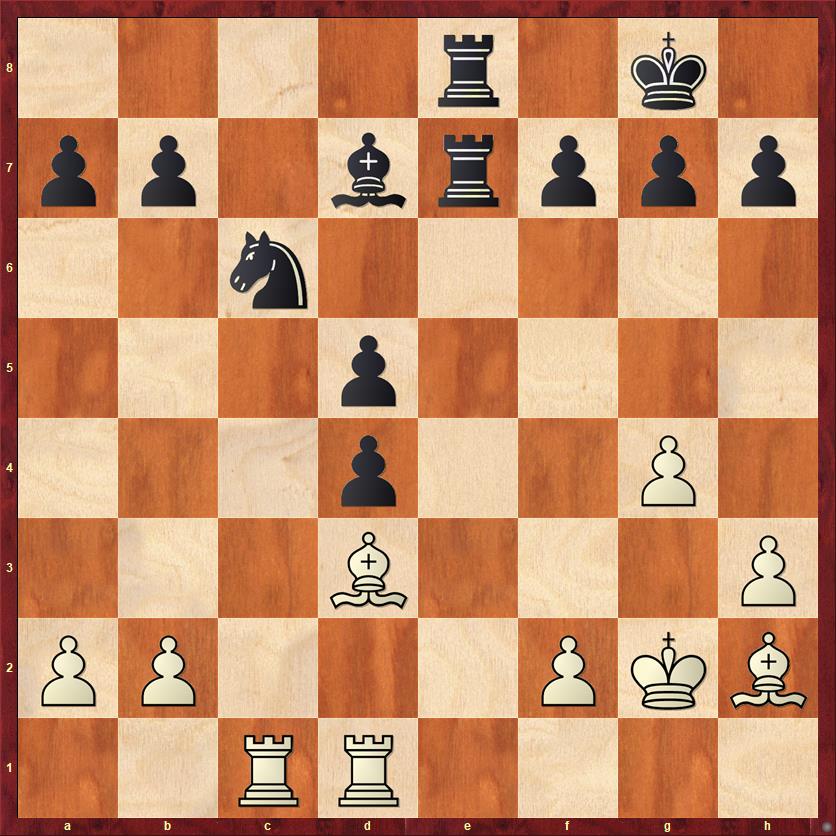
FEN: 4r1k1/pp1brppp/2n5/3p4/3p2P1/3B3P/PP3PKB/2RR4 b – – 0 25
Black is clearly in the driver’s seat, with two extra pawns (even if they are crippled) and nice control over the e-file. He has completed his development. The question is: What comes next?
The approach I would take is to ask what pieces of mine are under-performing, and how I can improve them. I would also ask what are my opponent’s best pieces, and how can I exchange or neutralize them. Immediately I see that my bishop at d7 isn’t doing much, and the knight on c6 is in its way. I also see that White’s bishops are potentially quite powerful, and I might want to block their diagonals or try to exchange one of them off. In view of those considerations, I would strongly consider 25. … Ne5. This forces White to make a difficult decision. Exchange off one of the bishops? Or play 26. Bb1, at the risk of allowing Black’s rooks to penetrate to the seventh rank? Notice also that this gives Black’s bishop a nice square on c6, where it eyes White’s king.
Another philosophy, which I respect even though it isn’t my normal style, is for Black to take a move to improve his position without making any commitments. He can get away with this because White has no threats. One move that comes to mind is 25. … g6. It simply creates a flight square for Black’s king, so that there will be no back-rank mates in the future, and also it supports a possible … f7-f5 break. You will very often see moves like this in grandmaster games, where the GM will move his king aside or give it a flight square even if there is no need to in the present position. You never know when that might be a game-saving move in the future…
Instead of … g6 or … Ne5, Atlee played his first bad move of the game,
25. … Re6?
Not only is this move tactically flawed, it also doesn’t have any very good purpose. Atlee said his idea was to bring the rook to f6 or g6. But those are terrible squares for a rook, and create no real threats. I’ve noticed before that Atlee seems to be much too fond of rook lifts, and this is an excellent example. The rook is best right where it is, in a battery on the open e-file.
26. Bf5! …
This move is more complicated than it appears, and you should try to see if you can work out all the complications. I actually thought that Atlee might have played the move 25. … Re6 in order to bait me into playing this move.
26. … R6e7 27. Bd6! …
I could of course play 27. Bd3, offering a repetition of position, but that would give Atlee a chance to find a better move than … Re6. Atlee said after the game that he actually overlooked 27. Bd6.
27. … Bxf5 28. Bxe7 Be4+!
Kudos to Atlee for spotting this zwischenzug.
29. f3 Rxe7 30. fe …
How should Black recapture?
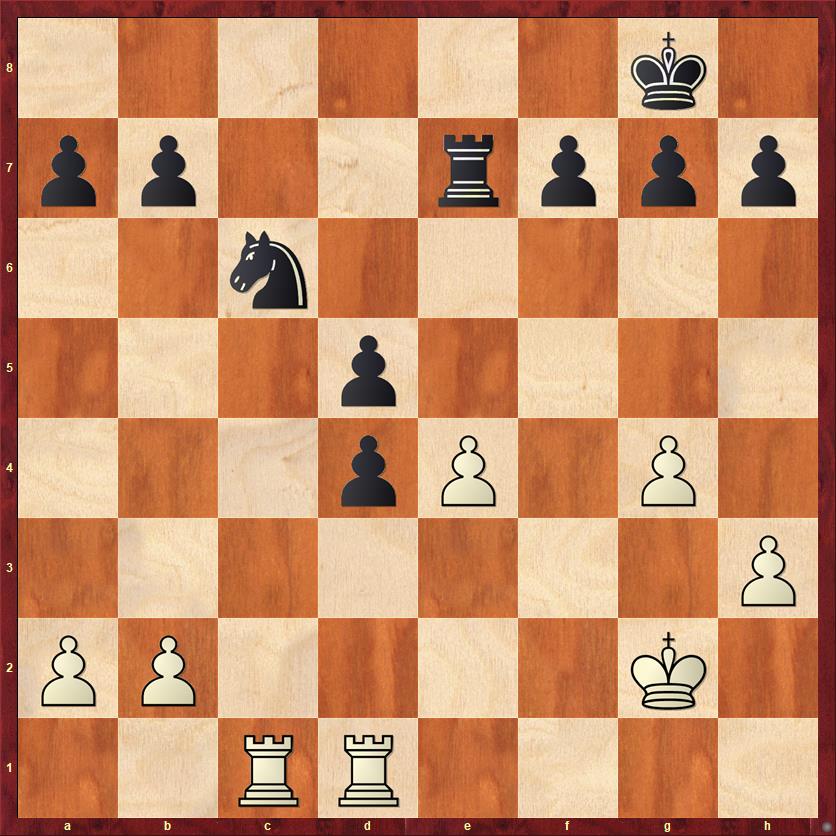
FEN: 6k1/pp2rppp/2n5/3p4/3pP1P1/7P/PP4K1/2RR4 b – – 0 30
The answer seems to be obvious, and I think that Atlee took no more than a few seconds to play his move.
30. … de?
Black would be absolutely winning here if it were not for one little tactical trick up White’s sleeve. Now was the time to see that trick and bail out with 30. … Rxe4. Although this would be a bitter disappointment for Black, because he was hoping to straighten out his pawn formation, still he has a lot to be happy about: three pawns for the exchange, strong control of the center, and a beautiful e-file with an immediate threat of … Re2+. I thought this position would be in Black’s favor; the computer disagrees and evaluates it as dead even. Still, that is what Black should have played.
31. Rxd4! …
This is the tactical trick. Black can’t take my rook because he would be mated on the back rank. Now he regrets the fact that he didn’t ever take the time to give his king a flight square! (For example, with 25. … g6.)
As for me, I felt incredibly lucky that after being outplayed for the first 25 moves, I have a bolt from the blue like this that gets me back into the game.
31. … h6?!
Atlee was a little bit shell-shocked from my last move. This is the most automatic way of stopping the back-rank mate, but not the best. After the game he pointed out that he should have played 31. … f5, which at least saves a tempo compared to the game. That might have made the difference between a draw and a loss.
32. Rdc4 g6 33. Kg3 f5 …
Here Atlee had to go, so we adjourned the game and finished it two weeks later. The adjournment gave me a lot of time to think about the position and had a very significant impact on the outcome of the game. I encouraged Atlee to study the position at home and he did, a little bit, but not as much as I did. The first two moves after the adjournment were pretty automatic:
34. gf gf 35. Kf4 Rf7
But now we reach a huge fork in the road for White.
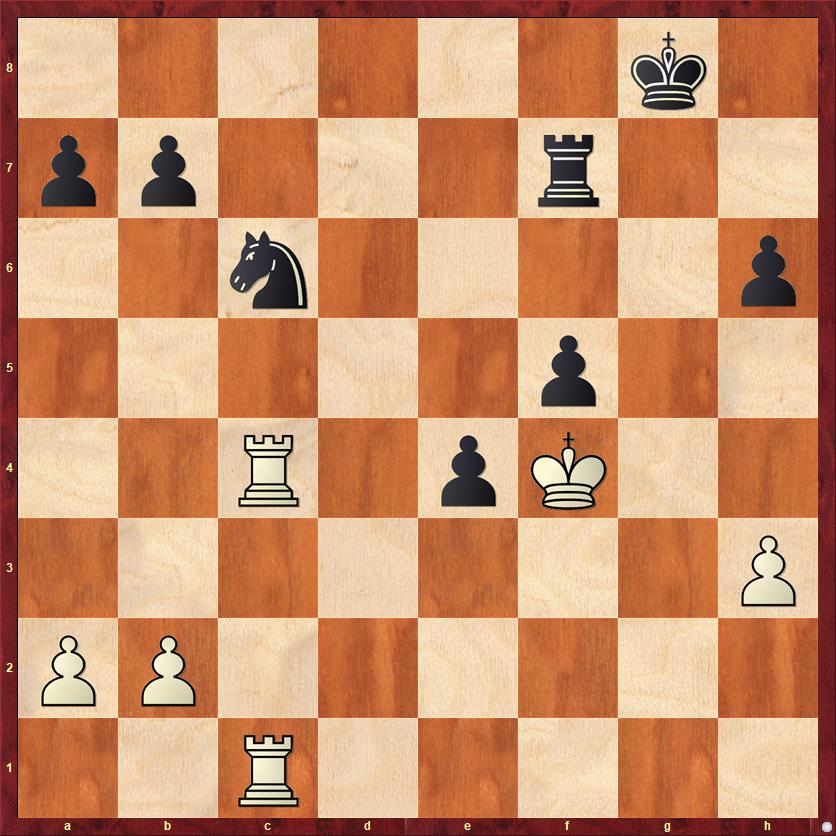
FEN: 6k1/pp3r2/2n4p/5p2/2R1pK2/7P/PP6/2R5 w – – 0 36
Here are some questions to answer about this position. I encourage you, as I encouraged Atlee, to take a lot of time and make sure you thoroughly understand your answers. 1) Who stands better and why? 2) Should White sacrifice back the exchange with 36. Rxc6? 3) If not, what is White’s plan and how can White make progress?
I’d like to start with question 2. I can say that my intention when we were playing the game was to play 36. Rxc6, so the adjournment absolutely changed the course of the game. It’s extremely tempting, because I strongly suspected Atlee would continue 36. Rxc6 bc 37. Rxc6 Kg7 38. b4 Rf6. This is kind of what any class-C, class-B, or class-A player would do, but after the surprise 39. b5! Black cannot trade rooks: 39. … Rxc6?? 40. bc and Black’s king is outside the “square” of the passed pawns.
Unfortunately, the more I looked at the position after 36. Rxc6 bc 37. Rxc6, the more I became convinced that the endgame was just drawn. The method of drawing is extremely instructive. In rook and pawn endings, rook activity is everything. It’s almost always worth giving up a pawn to make your rook active. In this position, Black must let go of his pride and joy, the connected passed pawns, and play 37. … Rb7 or 37. … Rd7. For example, after 37. … Rb7 38. Kxf5 Rxb2 would be a very easy draw.
I wouldn’t expect Atlee to play this way. I wouldn’t expect anyone under 2000 to play this way, because they would be too emotionally attached to the protected passed pawns, which seemed to be Black’s main advantage. But you always have to assume your opponent will play the best moves. As White, I can’t play 36. Rxc6 unless I am willing to accept a draw. That brings us to question 1: Who stands better and why?
The most important thing about this position is that Black’s connected passed pawns, seemingly a great asset, are really a paper tiger. They are blockaded and not going anywhere, and as long as they are blockaded, Black’s pieces are tied down defending them. Also, as long as the pawns are immobile, we should expect White to have the advantage, simply because White has stronger pieces — two rooks against a rook and knight. White absolutely should not be satisfied with a draw.
Now we come to the third question: If not, what is White’s plan and how can I make progress?
First, it seemed obvious to me that if I could trade rooks, I would be winning because there is no way that the knight can hold the queenside against White’s rook. Unfortunately, it is very hard to force a rook trade. Black can play his knight to e7, covering the squares c6 and c8, and Rc7 is never possible because … Nd5+! wins a rook! Here I have to admit that my king position is very unfortunate on f4, but moving the king back to e3 is no improvement! Also, moving the king to e5 prematurely will just lead to getting my king chased around.
For a very long time I couldn’t find a way around this problem, until I had a very Nimzovichian thought. What if I just take all the squares away from his knight? Let me push my pawn to h5, preventing … Ng6; let me push another pawn to b5, taking away the c6 square; and then let me move my rooks to the d-file. It’s slow, agonizingly slow, but on the d-file my rooks can penetrate his position better than they can on the c-file. And meanwhile Black’s knight is just turned into a sad, pathetic piece on e7.
Further, an idea occurred to me that was not entirely correct, according to the computer, but which I liked: sacrificing my h-pawn in order to draw his knight away from the center, which will then allow me to play Rc8+ and Rc7, forcing a rook trade. I thought that this would certainly be winning.
So, bit by bit, the Nimzovichian idea of restriction with b4, b5, h4, h5, and Rd4 started to come together and look like a really promising way to play for a win, with no real downside. The computer doesn’t really disagree except that it thinks I should have started with the h-pawn instead of the b-pawn. Fair enough. I will still, however, give my next move an exclamation point because of the deep thought behind it.
36. b4! a6 37. a4 …
Again the computer says 37. h4 right away is better.
37. … Ne7 38. h4 Rg7?
The true test of my idea would have been 38. … Ng6+ 39. Ke3 Nxh4. I will not give the computer’s long-winded analysis, but with best play it seems as if Black will have to defend with amazing precision to maybe hold a draw. If the computer is right, then I should have pushed the h-pawn before the b-pawn in order to avoid the pawn sac.
As it turns out, Atlee takes the bait (the h-pawn) but in a worse way, with his rook.
39. h5 Rg4+ 40. Ke5 …
Now that Black’s rook has left its defensive post, this penetration with my king is decisive.
40. … Rg5 41. Rc7 Nc6+
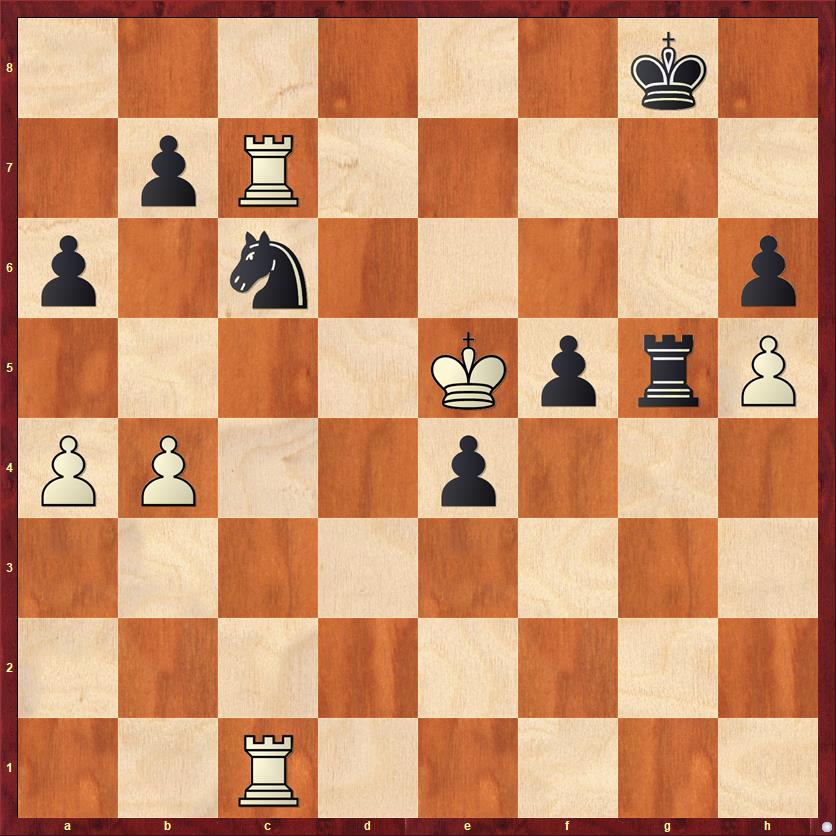
FEN: 6k1/1pR5/p1n4p/4KprP/PP2p3/8/8/2R5 w – – 0 42
White wins with one last tactical trick.
42. Kf6! …
Now 42. … Nxb4 would walk into a mating net after 43. Rc8+. Also, 42. … e3 (pushing the passed pawns at last!) would be a classic case of too little, too late: 43. Rxb7 e2 44. Rxc6 e1Q. Black gets a queen, but White gets a checkmate after 45. Rc8+. The actual game finished somewhat similarly:
42. … Rxh5 43. Rxb7 Rg5 44. Rxc6 Black resigns
I really loved this endgame because of the deep conceptual problems I had to solve, and the way that it exemplifies some of my favorite endgame themes: the power of the more active king, and the power of checkmate threats, which many people underestimate in the endgame.
Also, I liked the game because it was not just a lesson for Atlee, it was a lesson for me. That’s a sign that I’m doing my job as a teacher!


